Showing posts with label Tim Holtz. Show all posts

Friday, November 18, 2016

Three Tim Holtz Birthday Cards


Hi Friends,

Disclaimer!  I'll start off by saying this post has been sitting as a "Draft" in my "Publish" file for almost 2 years - and I don't know why!  So yah, they're older stamp sets and maybe not so inspiring any more since they are so "last year" lol!!  I truly have no idea why I didn't publish it -- but anyways, here goes...

Its birthday time around here and it's the time of year when it's "boy" birthdays for several weeks -- so I'm stressing about the masculine style birthday cards I have to make.  Tim Holtz to the rescue, no one else does it better!

The first card displayed uses the cupcake from Tim's "Birthday Blueprint" set.  I stamped the design onto a sheet from TH "Destinations" paper and then stamped the cupcake again onto some Basic Grey paper scraps. I cut away the cupcake and candle pieced it onto the background. Some strips of paper confetti and words from the stamp set were added to the layout with metal brackets and brads to complete the card.


Next, from the same TH stamp set, I followed the same technique using Authentique "Celebrate" 6x6 paper pad and layered it onto white, black, then Kraft cardstock.  The metal "wish" sentiment is by "Momenta".  


Here you can see where I popped up some of the paper pieces to add dimension.  I also added Crystal Effects to the candle flame.


This last card is from the same Tim Holtz "Birthday Blueprint" set, using the same papers as the cupcake above, but I used the "Present" image and paper pieced the bow.  So easy to do, and hopefully not so frilly that I can give it to a "boy" and he won't cringe!  LOL!

TFL, I'm so glad you stopped by!  Have a Blessed Week!!
Anne


Wednesday, May 27, 2015

Light Blue Fuchsias


Hi All!

This project is an example of how the Cascading Fuchsia collection practically makes projects themselves!  This wall hanging started out as a card, but it ended up being a bit more 3-D than even I could justify, so I added a hanger and it became a wall hanging!

I started with a light blue panel from the Everyday Heroes Collection because of the blue tones it contains.  I used the same paper collection and stamped 3 of each size of the fuchsias and assembled them.  Next I stamped and die cut leafy branches onto gold metallic paper and shaped them.  Once I had all the dimensional floral pieces, I die cut two lattice shapes that would become "gates" on my background.

I tucked in a cute Tim Holtz Bird Cage (that I prepared with gold paper and a tiny bird) behind the "gates" and proceeded to add and embellish my scene with the fuchsias and leaves. I used a gold Krylon pen all around the edge of the base panel.  I cut a sentiment strip from the collection and edged it with gold as well.  Finally, I added a maroon ribbon to the top of the display. 

Once it was all done, I could tell this was not going to hold up to just a standing card!  So I adhered the whole thing to mat board, punched a couple of holes with my Crop-a-dile, and added eyelets wire.

Here is a list and links of the HC products I used on this project:
Everyday Heroes Paper Collection
Fuchsia Bouquet Cling Stamp Set
Cascading Fuchsia Die
Classic Leaf Cling Stamp Set
Open Leaf Cling Stamp Set
Classic Leaf Die
Everyday Hero Newsprint Cling Stamp Set
Decorative Lattice Swirl Die

The Heartfelt Creations blog has got some extra super amazing projects, cards and layouts created by the Design Team.  Stop by to see more of what you can do with this awesome collection!!

TFL, I'm so glad you stopped by!

Saturday, June 7, 2014

So I Bought a Few Stencils


Hi Friends,

Slow on this bandwagon I think... but I bought a few stencils awhile back and hadn't used any yet.  So here's a card that was inspired by many seen on Pinterest.  (What did I do before Pinterest???).

The stencil on this card is Heidi Swapp.  I used a sponge dauber to sponge TH Peacock Feathers, TH Spiced Marmalade and SU Smokey Slate over the corner. Apparently not the best tool to use for stencils, will have to investigate other applicators for best results!


I added a flower from a stash of some I made using TH Sizzlits Tattered Flower Garden.

The sentiment is Hero Arts "Made With Love" set in Versafine Onyx Black.  I sprinkled it with gems, rounded the corners and mounted it to my card base.

Hope you have a great weekend!   TFL, I'm so glad you stopped by!


Wednesday, June 4, 2014

An Inky Background - Tim Holtz Mini Distress Ink Pads


Hi All,

The watercolor technique on this card is fun to play around with because you can't predict what you'll end up with, but the result is always unique and surprising!

I tapped some Tim Holtz distress ink pads randomly and directly onto an acrylic block, sprayed with lots of water so it started to blend, then pressed it onto my white cardstock panel. It was easy to get a variety of colors using Tim's new mini ink pads.  Their tiny 1"x1" size makes it easy to fit lots of color onto a block for this technique.  

After the background was completely dry, I layered it onto black cardstock, then stamped my images (Candles from Inkadinkadoo Birthday Sentiments) and sentiment (Hero Arts Essential Messages) using Versafine Onyx Black ink.  Added a tiny bit of yellow glitter to the flames of the candles and then mounted the finished panel onto white cardstock base.

Good as done!!

TFL, I'm so glad you stopped by!

Saturday, May 31, 2014

Tim Holtz Layered Butterfly Die

 Hello All,

This card is made with the new TH "Layered Butterfly" die that comes with the coordinating embossing folder.  It's large and awesome and fun to create with!  This is just one of the cards I made with it this weekend.

I die cut the butterfly from DCWV paper, embossed it with the folder, distressed it a bit with Walnut Stain ink and mounted it to the card -- allowing it to bow out for dimension.

The background is stamped with a sentiment from TH "Phrases I" set and I added a metal tag from his "Word Bands" collection.  The keyhole down the center of the butterfly is by BoBunny. Yup, Tim Holtz is my hero!!

TFL, I'm so glad you stopped by!

Sunday, November 17, 2013

2013 Christmas Cards

These are Christmas cards I've made for my Etsy Shop.  It's almost overwhelming anymore to narrow it down to just a few that you want to make for the holidays!  I have stuck to some simple die-cutting and assembly for these ones!

This first card is one in a series of three that I've made so far -- all basically the same but different cardstock and patterned papers.
The poinsettia is created with Tim Holtz Tattered Poinsettia die.  Love this die because it is a large die that will cut through multiple layers at once so it only requires one run-through on my Big Shot to cut all the pieces. 

I used a stylus to create a crease line in each of the blossom leaves then pinched them along the crease to create a partial fold in each leaf.  This gives the flower the great dimension it has.

The stamens in the middle came in a box that I got from Michaels; they come already clustered like that so they are perfect for this flower.  The glittery leaves were cut from a decorative pick that all the hobby and craft stores have piled up!

The background chalkboard-style patterned paper is by "Me and My Big Ideas" that I purchased as a single sheet from Hobby Lobby. 

These are the other two I made using the same steps:

This last one is my favorite, it just makes me smile and he was fun to put together!

The tree branch in the back is Memory Box, the snowman is made with a Basic Grey "Snowmen #2" die by Sizzix, and the sentiment is from Just Rite Clear "Large Fancy Holiday Sentiments".

TFL, I'm so glad you stopped by!

Friday, July 5, 2013

Card Catch Up!


Hi Everyone,

I'm posting several cards today to try to get a little caught up on some card making I've been doing this summer.  I've been side-tracked by some other crafty projects that aren't necessarily cards, but I'm definitely having fun.  I'll try to get more of those projects up here too.  Meanwhile . . .

Here's my first card that I made for this week's Inspiration Challenge that I'm hosting.  The webstore is "Poketo" and I chose this "Andrea Kang Wallet 2" as my inspiration.  I wanted to make a card in the pink and grey color scheme, but when I sat down to do it, it didn't turn out anything AT ALL like I was envisioning.  I'm a much better artist in my imagination LOL!!  The dies used for this card are Cheery Lynn Exotic Butterfly Small, Mini Fanciful Flourish.  Marianne Design #LR0202 border, Oval Nestabilities.
 

I had fun making this next card for my Nephew's BD.  I used three tiny stamps of strange, little bald men that I've had for awhile.  They're from an Etsy website called "Pictureshow."  Their stamps are so funky and retro and I just love them. On this card, I fussy cut the little men and had them grabbing onto a banner that says "Happy" as part of a birthday sentiment that seems to be getting away!


This next card is one I made using a Tim Holtz Blueprint Series stamp set called "Vintage Things".  The images all look like they are still in draft stage on a blueprint.  I embossed the image and sponged colors over the areas kind of randomly.  I dressed it up with some ivory seam binding, a Prima rose, a swirly metal finding and some tiny pink plastic flower buds.


This next group of cards go all the way back to Easter!  Yup, that's how behind I am on posting.  (The lead card for this post up at the top is a close-up of one of them.)  The cards were made using bubble dome kits that I bought at a Scrapbook convention in January.  I tried to find more on line but the store that had them at the show didn't sell them on line.  The good news is, I went to a convention last month and Sizzix now carries a slightly different version - at a much better price!  They are "Susan's Garden" Domes, Item #658434 if you're interested in trying them out.


For these Easter themed cards, I found some vintage background printables on-line and used them for the backdrop of the dome.  Then I just proceded to fill it up with flowers and do-dads and it just could not be easier to create a WoW! card!


This next card is made with a new Heartfelt Creations stamp set that I got that coordinates with my Spellbinders Tattered Blossoms dies.  I stamped the image onto white CS, then die cut the two smallest sized blossoms and layered them over the stamped image.  I added Stickles and bling centers.  The sentiment is SU Perfectly Penned.


And the last one for this posting is an Anniversary card that I paper pieced and colored with Copics.  The stamp is by Art Impressions.  I actually made two different ones but apparently I only photographed this one for some reason!

TFL, I'm so glad you stopped by!
 

Sunday, June 9, 2013

Altered Clock and Things!

Here's a different project for you!

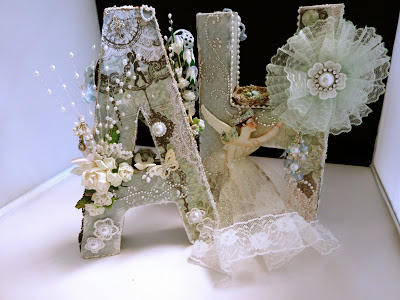
My friend Sandy and I decided to do an altered project "swap".  She did a STUNNING job altering my initials for me and I altered an alarm clock for her.

This is the photo of the project Sandy did for me, it doesn't do it justice -- but the good news is, she has a YouTube channel so you can see all the details about her project by viewing her video here:  "Altered Letters for Anne" . You HAVE to see the video, the details are amazing -- the back side of these letters are even more gorgeous so please do check it out!!


So here's the clock I started with -- an outdoor scene of brown bears in the woods in a dark brown, almost iron-colored exterior.  It was a clearance item I bought for $2.00 because the alarm was broken.


I took it completely apart and gave all the exterior parts a primer coat of Gesso.  This photo shows samples of the different stages of painting. The dark handle is the color it started with.  The white on the bell is the Gesso coated sample, the green/gold clock base is my final coat and my attempt at an aged patina look.

To get the aged patina look, I "wanted" to try out the Ver Day patina technique, but it was going to take 48 hours just to let the first coat dry and I only had an afternoon to do this.  So instead, I just dry brushed some turquoise acrylic paint and TH Metallic Distress Ink in Antique Bronze on top of the Gesso coat, and it all dried almost instantly.  It pretty much gave me the effect I was looking for (without the wait!). BTW, those TH metalic distress stains are the bomb!!  Seriously fabulous glimmer and mixability.  Love them!!

This is a picture of how I altered the alarm bells. I turned them upside down and lined the insides of them with some brown vintage lace that I had in my stash. For the outside of them, I found some lightweight swirly metal pieces in my stash too, so I bent them as best I could to conform to the shape of the bells and glued them on with E6000.

The green cabachon rosette bling on the bell is actually an earring from a $1.00 pair that I bought just for the purpose of using it on a project "some day"!  I snipped off the post of the earring and glued the decorative part onto the bell.

Once those were done, I started on the face of the clock (under the glass), I found an image of a lady from the Graphic 45 "Ladies Diary" collection that I liked and strategically cut out a circle shape from the DP that included the lady.  I covered the clock face with the circle, covering the clock's original photo of the bears and mountain scene.

Then the fun part.  I started adhering my doo-dads, ribbon, swirly bling and a variety of paper flowers to the "new" clock face.  Some of the flowers I used were extras I had already made for other projects (photo below), so I painted the mis-matched ones with the same turquoise and bronze paint combo that I used on the clock's exterior so they would blend with the color scheme.  Some of the other flowers I had purchased from a variety of sources and they were part of my stash.

I had to keep playing with the composition of the whole thing to make sure it all fit under the glass without getting crushed once I put the clock back together!  The photo below shows a few of the charms that were included in the design (a clock face, bird cage, little keys).

When the face was all done, I reassembled my clock pieces (the bells, handle, legs and glass front) and began altering the outside of the face - on top of the glass.  Again, just randomly selecting items that I liked and thought would go with the design.

The larger swirly piece on the top part of the clock is a molded embellishment by Melissa Frances.  That was originally white and actually the first piece I glued to the glass. I painted the piece with the same paints I used for my patina effect prior to gluing it onto the clock face. 

Below is a picture of the clock's Left side, the embroidered applique towards the bottom is by Mon Ami Gabby (love their stuff). 


Here's a photo of the clock's Right side; it's got another of the same applique, some fabric roses and a few "leaf" beads by BlueMoon beads.
And that is pretty much it!  (This is what my craft space looked like when I was done!)


Whew!!  What a great way to spend a Saturday afternoon!!

A few more photos of the finished clock:


TFL, I'm so glad you stopped by!