Showing posts with label sizzix dies. Show all posts

Sunday, November 17, 2013

2013 Christmas Cards

These are Christmas cards I've made for my Etsy Shop.  It's almost overwhelming anymore to narrow it down to just a few that you want to make for the holidays!  I have stuck to some simple die-cutting and assembly for these ones!

This first card is one in a series of three that I've made so far -- all basically the same but different cardstock and patterned papers.
The poinsettia is created with Tim Holtz Tattered Poinsettia die.  Love this die because it is a large die that will cut through multiple layers at once so it only requires one run-through on my Big Shot to cut all the pieces. 

I used a stylus to create a crease line in each of the blossom leaves then pinched them along the crease to create a partial fold in each leaf.  This gives the flower the great dimension it has.

The stamens in the middle came in a box that I got from Michaels; they come already clustered like that so they are perfect for this flower.  The glittery leaves were cut from a decorative pick that all the hobby and craft stores have piled up!

The background chalkboard-style patterned paper is by "Me and My Big Ideas" that I purchased as a single sheet from Hobby Lobby. 

These are the other two I made using the same steps:

This last one is my favorite, it just makes me smile and he was fun to put together!

The tree branch in the back is Memory Box, the snowman is made with a Basic Grey "Snowmen #2" die by Sizzix, and the sentiment is from Just Rite Clear "Large Fancy Holiday Sentiments".

TFL, I'm so glad you stopped by!

Sunday, September 29, 2013

3-D Card and A Collage Card


Hello Friends,


This card is made with a collage of DCWV Artistic Collage papers, some book print, and a picture of a Victorian era woman holding a bouquet of flowers.   I tore the papers and distressed them with TH Vintage Photo ink, added some crocheted lace trim, a feather, a key and keyhole brad, swirly bling and punched butterflies to complete the look.  I have this one for sale in my Etsy shop this week!


Next, I had to make another 3-D Accordion Card!  The Karen Burniston "3-D Accordian Flip" die makes it just plain fun and very easy to put together!  Here's a YouTube link of Karen Burniston demo-ing how to use the die to make one for yourself!  Here's a link to the first one I made: Accordian Card. 

I used the same DCWV designer paper  (Artistic Collage) as I did for the first card. I pulled out multiple sets of K&Company's Brenda Walton 3-D stickers to embellish the different panels.

First Panel - stickers and Memory Box Leafy Branch die

 
Second Panel - More stickers and Leafy Branch die

This pane uses Basic Grey letter stickers, a bow charm, some more Stickers and 2 AC brads!
This third panel has an extra interactive element.  The panel lifts up to reveal a space for journaling or a special message to the recipient!

Last Panel - SU "Perfectly Penned" sentiment, Zing White EP, Stickers


TFL, I'm so glad you stopped by!

Saturday, September 21, 2013

Accordian Card


Hi Friends,

I love the Karen Burniston "Accordion Flip 3-D" die!  I was playing with it and just quickly threw this together - yes - quickly - with scrap papers and embellishments that I had not put away from previous projects.  (You can tell because the colors are not very coordinated and the theme is a mish-mash of different findings!)  But it's one of my favorites that I've made recently so I photographed it to share with you.

Here's some close ups:

The silver embellishments are all die cut from aluminum baking tins from the Dollar Store!

Stacked some flat Prima flowers from a Prima Artistry Flowers collection

Another aluminum tin piece that I die cut with a Spellbinders die.

The paper banner is a Simon Says Die and coordinating stamp set
The main frame part is designed to go together with another Sizzix die, which at the time I made this I did not have, so I used Spellbinders Labels Two Nestabilities as a layering panel.  I distressed all the edges and stamped a variety of background stamps on each before adding my embellishments. 
Front / unopened

If you're wondering, when you close the whole thing to send, it is about 1" thick, it's not something you can send in an envelope!  It's either going to have to be hand-delivered or put in a box as part of the gift! 


TFL, I'm so glad you stopped by!
 

Friday, July 5, 2013

Card Catch Up!


Hi Everyone,

I'm posting several cards today to try to get a little caught up on some card making I've been doing this summer.  I've been side-tracked by some other crafty projects that aren't necessarily cards, but I'm definitely having fun.  I'll try to get more of those projects up here too.  Meanwhile . . .

Here's my first card that I made for this week's Inspiration Challenge that I'm hosting.  The webstore is "Poketo" and I chose this "Andrea Kang Wallet 2" as my inspiration.  I wanted to make a card in the pink and grey color scheme, but when I sat down to do it, it didn't turn out anything AT ALL like I was envisioning.  I'm a much better artist in my imagination LOL!!  The dies used for this card are Cheery Lynn Exotic Butterfly Small, Mini Fanciful Flourish.  Marianne Design #LR0202 border, Oval Nestabilities.
 

I had fun making this next card for my Nephew's BD.  I used three tiny stamps of strange, little bald men that I've had for awhile.  They're from an Etsy website called "Pictureshow."  Their stamps are so funky and retro and I just love them. On this card, I fussy cut the little men and had them grabbing onto a banner that says "Happy" as part of a birthday sentiment that seems to be getting away!


This next card is one I made using a Tim Holtz Blueprint Series stamp set called "Vintage Things".  The images all look like they are still in draft stage on a blueprint.  I embossed the image and sponged colors over the areas kind of randomly.  I dressed it up with some ivory seam binding, a Prima rose, a swirly metal finding and some tiny pink plastic flower buds.


This next group of cards go all the way back to Easter!  Yup, that's how behind I am on posting.  (The lead card for this post up at the top is a close-up of one of them.)  The cards were made using bubble dome kits that I bought at a Scrapbook convention in January.  I tried to find more on line but the store that had them at the show didn't sell them on line.  The good news is, I went to a convention last month and Sizzix now carries a slightly different version - at a much better price!  They are "Susan's Garden" Domes, Item #658434 if you're interested in trying them out.


For these Easter themed cards, I found some vintage background printables on-line and used them for the backdrop of the dome.  Then I just proceded to fill it up with flowers and do-dads and it just could not be easier to create a WoW! card!


This next card is made with a new Heartfelt Creations stamp set that I got that coordinates with my Spellbinders Tattered Blossoms dies.  I stamped the image onto white CS, then die cut the two smallest sized blossoms and layered them over the stamped image.  I added Stickles and bling centers.  The sentiment is SU Perfectly Penned.


And the last one for this posting is an Anniversary card that I paper pieced and colored with Copics.  The stamp is by Art Impressions.  I actually made two different ones but apparently I only photographed this one for some reason!

TFL, I'm so glad you stopped by!
 

Wednesday, February 27, 2013

Die Love!

Hello Friends!

At last I am on my last two challenge cards from the Love Fest over on SCS, but they were both fun ones and I used lots of my new dies!

I created this first card for the Love Fest challenge hosted by The Greeting Farm.  We were to create a card with a "love" theme using dies.  So, I used many dies!!  I used a "Framelits" die by SU!, the "Fancy Lattice" die by Spellbinders, a Vintage Noir #6002 flourish die from Joy Craft, a SU! "Embosslits Beautiful Wings" butterfly die and all three sizes of rose dies from the Spellbinders "Bitty Blossoms" die set. Now that's love!! 

After assembling all my die cuts, I glued them to my card base and I added some tear-drop pearls and a vintage button heart. I started to add a little banner with a verse about love, but decided to leave it off since the design was already so busy. Hoping my heart button alone qualifies as a "love theme" for the challenge!

My next card was super quick and simple.  This one goes in the mail tomorrow to my Aunt Dolores who has been battling cancer for almost a year now.

I made this card for the challenge hosted by Verve: "In Love with Color".  I used TH Large Rosette die, a Quickcuts Pinking Circle die and a new Sizzix "Decorative Border and Heart" die.  The sentiment in the center is from Verve "Hope Blooms" set.  This card was as quick and easy to make as it was to blog about! 

TFL, I'm so glad you stopped by!
 

Sunday, December 16, 2012

I Conquered Christmas This Year!

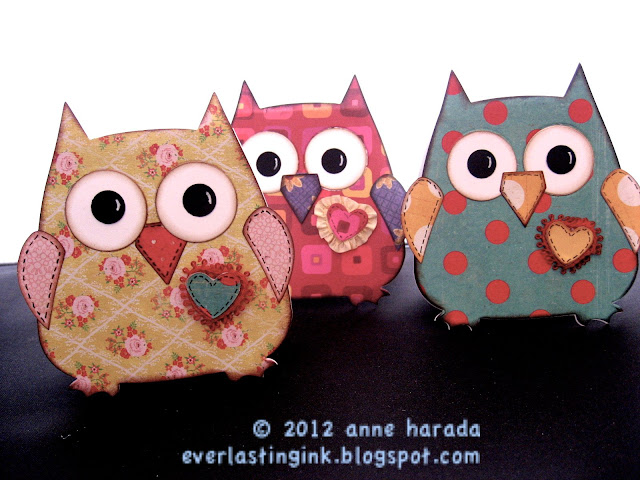
Sizzix "Owl #2" Die
Oh My... Where to start!

Today I worked on my first card/project that is not Christmas related.

All my spare time in my room over the last two months has been spent making crafts for two Craft Shows I did (my first ones BTW, what a blast!), plus my personal Christmas cards, and of course, lots of Christmas gifts for friends and family.  And you know what?  I'm done.  Yes. I said it, it must be real!

I have finished every project, wrapped every gift, mailed every card and gift that had to be sent out, and I am just euphoric today!!  I even organized our office Christmas party, our home group's Christmas party, and went to a Christmas production at our church.  I'm telling you.... I conquered Christmas this year!!!  I'm going to slow down now, take some days off from work, and enjoy Christmas and a brand new year.  That in itself is a gift!!

I'll be posting all the Christmas stuff I've been making over the next few posts.  I don't want to cram too many into one and bore you to death!!  Please come back to check them out!


For today though, this is my not-Christmas project!  I checked out my fav challenge over on SCS and Stephanie had the most awesome website ever for insiration!!  Loved it.... too much... my shopping cart runneth over!!  The website is called "House 8810" and I chose these "Swell Pot Holders" as my inspiration.


I cased Diane's Zechman's cute owls cards that I spotted on Pinterest. As soon as I saw her critter cards, I was on-line ordering the Sizzix die she used -- Sizzix Owl #2.  The die just makes it so quick and easy to create these guys!

Basically, all I did was fold my white CS base in half, then die cut it and positioned it on the die so the crease at the top does not get cut.   Made 3 card bases like this.


Then I die cut stacks of paper scraps and pieced them all together. I added a tiny bit of ruffles and fiber around the hearts, a few doodled stitch details with my Copic Micron pen and white highlights on the eyes with a white gel pen to complete them. These are just too easy and fun! I may be making them the rest of the afternoon!!


TFL, I'm so glad you stopped by!