Showing posts with label Thank You Cards. Show all posts

Wednesday, February 25, 2015

Dying Ribbon to Match Your Card

Hello Everyone!

My Heartfelt Creations post this week is a card I made with the Butterfly Medley Collection.  It's a pretty simple card to create with just some embellishments and paper from the Butterfly Medley paper collection (of course)!   I ended up dying some white seam binding to match my card, so I thought I'd share that easy technique with you today, too.

For the card, I started by sponging Walnut Stain Distress ink on the edges of a 4" x 5-1/4" panel of seed-themed background paper from the paper collection.  I found a piece of burlap material in my stash, cut it into a square, pulled off some of the strands from all four sides to fray it a bit, and then adhered it at an angle onto my card. 

I selected one of the coordinating tags that comes as part of the paper collection and sponged Distress Ink on the edges.  I stamped a sentiment from the "Heartfelt Expressions" cling stamp set onto the tag, then added a jumbo eyelet to the top.  I adhered the tag over the burlap piece with some foam squares.  At this point, I decided my tag needed purple ribbon, so I stopped to dye some white seam binding (steps are shown below) with Viva Decor 3-D Stamp Paint to coordinate with my card. 


Finally, I dug up ("get it"??) some tiny garden tool embellishments that I've had forever (I was surprised I found them!) to glue on to the card front. 


Dying seam binding is really easy, just three steps basically.  Here's what I did:


1.) I mixed some Viva Decor "Violet - Metallic" 3-D Stamp Paint with water to make my ribbon dye solution. 

I just lightly dipped my dauber into the paint jar and then transferred the small glob that the dauber picked up to the dry container by tapping it off onto the bottom of the container.  I added about 1/2" of water to the container, stirred it up a little with the dauber and just sort of eye-balled the color to see if it was the tone I was going for.  I decided it was the right color I wanted so I didn't add any more paint to the water (at this point more paint could be added to intensify the color or a different color altogether could be mixed in to make a custom dye color).

2.) I estimated how long of a piece of seam binding ribbon I'd need for my project, cut it to that length, and dropped it into the container of purple water.  I used my dauber to smash the ribbon around in the dye solution so it would soak up the color.  After a a few seconds of smashing, I pulled the wet ribbon out of the water and moved it into a ziplock baggie, sealed the top, and kneaded and squished the ribbon around inside the baggie to get it nice and wrinkled and full of color.  This went on for about two minutes.


2.) I pulled the ribbon out of the baggie, balled it up one last time real tightly to ensure there was lots of wrinkling going on, and carefully dried it with my heat tool.  Careful, too much heat will melt and/or burn the fabric -- don't ask...


This is a look at the dried, dyed ribbon.  I couldn't capture it in the photo, but because the 3-D Stamp Paint is full of all kinds of awesome glimmer, that glimmer and sparkle transfers to the ribbon!  It's a pretty cool effect!


Finally, I tied a double bow with my newly-dyed purple ribbon using my ribbon-tieing block thing and glued the bow onto the tag on my card.  (I didn't actually loop the ribbon through the tag's hole, I can't get it to hold the bow shape when I do that -- I'm kind of clumsy that way -- so I just fake it by gluing it on.)

 And there you have it....

The Heartfelt Creations products I used for my card today are:
HCDP1 251 Butterfly Medley Paper Collection
HCPC 3474 Heartfelt Expressions Cling Stamp set
Viva 3D Stamp Paint in Violett-Metallic

Thanks so much for visiting today - I am always grateful and appreciate you checking out my blog!!  Please leave a comment if you can, and by all means, be sure to visit the Heartfelt Creations Blog today too, where all the creativity starts!!

TFL, I'm so glad you stopped by!

Monday, September 5, 2011

Thanks Set - Paper Piecing


This set is for my sister who asked me to make her some Thank You cards.  I really love the stamps I got from Purple Onion Designs designed by Stephanie Ackerman.  They are whimsical, easy to color and fun to paper piece, depending on my mood!  And they remind me of Judy, my sister who's going to get these! 


The stamps I used on these cards are "Hearts on a String", "Faith the Chicken", "Curly Bird" "Heart Flower" and "Pot-a-Flower".  (The "Thanks" sentiment is one of 3 freebies that came with my order!)  I stamped several different Basic Grey DP scraps with all the images so I would have a big selection to choose from when it came to assembling the cards. 


I made this set assembly-line style.  I first cut out my 6 main panels in white, doodled all the borders and then mounted them onto black CS.  Next I stamped my focal images onto the panels using Versafine Onyx Black ink.  Then, I just started cutting out the different matching pieces from the DP that I had stamped earlier and created the pieced images.  I popped up some of the pieces with dimensional tape.  On the big flowers, I added a K&Company bauble in the center just because they were the same fun, whimsical style as the images.  Once the focal image was done, I then selected some coordinating DP to layer under the finished panel, added another layer of black CS and finally, I mounted the whole thing onto a white CS base.

Here's pics of them individually:


The teeny hearts on all the "Thanks" sentiments and the teeny birdies like the one on this card are just some that I drew on DP and cut out and glued to the cards.


TFL, I'm so glad you stopped by!

Sunday, October 11, 2009

Not A Get Well Card

Supples used: Stamps: Artfully Asian, Paper: Basic Grey Scarlet's Ltr Collection, AC Spcialty Christmas Foil in Gold, Very Vanilla, Black. Accessories: Nestabilities, EK Success Border Punch, faux gold coin, gold dot pearls, gold stretch wire Today's amazing Featured Stamper is Chris aka Glowbug! Every card in her gallery is complex and gorgeous at the same time, filled with dimension and texture. What a great body of work!! I chose her Happiness Blooms Card to case. I kept the layout and punching but changed everything else so I could use the material I have. I paper pieced the leaves using the same Basic Grey DP. Omitted ribbon. This is also for this weeks DDC, hosted by JDMommy (Anne), to make a masculine Get Well Card without ribbon and flowers. Ummm, somehow I forgot the "Get-Well" part and made it a Thank You... So Sorry I blew it Anne!! Do I get make-up points because it's red??? LOL!! Congrats again to Chris, your gallery is amazing, and you are totally deserving of the spotlight this week!! TFL, I'm so glad you stopped by!

Sunday, June 7, 2009

I Am So Caught Up!!

Yahoo!! This is a happy day! At long last I have caught up with all my DDC challenges, my Belli challenges, and Father's Day!! Just in time to start a new list tomorrow LOL!! Here's the results of concentrated stamping all day yesterday....
This is a combo DDC Card for Joanne (aka Sleepy in Seattle) and for the DDC this week that I hosted. Joanne wanted to see flowers with lots of bling on the card, and I wanted to see newsprint on your card. So I made flowers with the newspaper and added bling to the flower's centers, bling across the top, and then I layered it onto some shiny reflective CS.
This next card is another DDC Card. This one was hosted by Charlene (aka Where M&Ms Gather): Charlene gave us a challenge to use paper piercing, paper piecing, and the colors Black, Sage Shadow, Regal Rose and Kraft. My photography didn't capture the colors quite right, but trust me, they are the real deal!! Don'tcha love those cool Primas?? They're Artsy Flower Mini Tin Mums by Prima Flowers. I made the square windows using Sizzix Movers and Shapers Window Panes XL die. The sentiment is from SU's Note of Thanks kit. Oh...and the paper piecing is the 3 little flowers on the Kraft panel. They are from SU Eastern Blooms set stamped onto some scrap BG paper. This DDC Card is for the challenge that Michele (aka Stop and Stamp the Roses) hosted. Michele's challenge was to use sponging on your card, and include 2 different ribbons and hardware of some kind. I used Basic Grey Glazed Brads -- I am so obsessed with those brads, they make me happy. I own so many!!!). They are from the Lime Rickey collection. Does anyone out there have any idea what the heck a "Rickey" is??? To corner punch this card, I used my new WeRMemoryKeepers Chomper that I got at the Arlington Scrapbook Convention this weekend. It's a combo 1/2" and 1/4" corner punch. Wonderful tool, punches so smoothly and effortlessly and you can see exactly where you're punching. Punches thick stuff (chipboard, acrylic, multiple sheets of CS) and thin (which the more expensive Zutter corner punch does not!). I love love love it. A great tool to add to your arsenal if you haven't already!! They run about $17.00 -- shop around and you'll find a good deal! If you want to join in ANY of the DDC challenges, please feel free to do so!! We'd love to see your cards. Just upload to SCS using keyword DDC and leave a comment letting me know so I can alert the other DDC gals!! We wanna leave you some luv!!! I also did a Belli Challenge card for next Wednesday's post -- so please stop by to see that one later this week. Thanks for checking in!!

Monday, March 16, 2009

Weekend Cards

I made several more cards this weekend, a couple of them were for challenges that I need to get posted up on SCS pretty quick here so I thought I'd blog them for ya first!
Supplies: Versafine Black Onyx ink, Copics, Basic Grey Marracah paper, Stamps by Judith and Heather, and MS border punch residuals (the corners are the negatives). Some piercing and satin turquoise ribbon to finish it off.
This first one is my accidental card. I was focusing on the list of Challenges I wanted to get done yesterday and I knew I had to get a card done with a bug and a then another one done with a bunny. I DID try to combine the two, and blehhh!! I did not like the look of it -- I cannot do cards with "scenes". Just not my forte, I need structure and boxes and circles. And alas, I digress... So anyhow, I made this bug card. Yay!! I finished my Doubledog Dare card. TA DA!! Oh wait. The Doubledog Dare Card is to make a card with a bunny. Well, then, I went back to my list and the bug card is supposed to be for the CAS challenge (Clean and Simple). And, this hardly fits a CAS challenge with all the layering and doo dads. So, my heralded "TA DA" was for naught. And so, that is how it became my accidental card. Maybe someone will be sick soon and it will go to good use. This second one is the "real" Doubledog Dare card for last week. Our hostess was Francie G. and she challenged us to make a card with a bunny. Of which I have many. So, I picked a non-Easter image (because I was feeling wild and rowdy) by Crafty Secrets -- Kewpies -- and colored it with Copics. I then layered it in black and pink and purple and yuck!! I didn't like it. So I tried another layout and couldn't find just the right DP to go with the colors of the image, and so I gave up on that idea. Finally decided to completely overwhelm the cute image with some Bazzil Bling paper and dry embossing and MS punches and ribbon, and pearls and hope it would somehow become gorgeous. Clearly, it did not. But, I was out of time (and ideas and patience) and this is my DDC for the week! Fun huh!!!??? AND YOU SHOULD TRY IT!! I KNOW YOU'LL DO BETTER THAN I DID!! Just make a card with a bunny, upload it to SCS using keyword DDC (so we all can drool over it!!) and let me know!! I'd love to know how you did!! Be sure to check out the DDC gallery to see all the other Bunny cards as well as the past challenges. You can participate in any of them, there's no time limit! And last but not least, a Thank You card... We went to a Beer and Chile tasting party this weekend and entered the "Chile" contest. Everyone in the contest had to make their best chile and then we all tasted everyone's and voted. And guess what, I won!! Woo Hoo!! And even better, it's the 2nd year in a row to win!! Anyhow, this is the thank you card for that event to the hostess-ers for the fun prize. (I know, it has nothing to do with chili.) This card is made with the new Stampin Up! "Manhattan Textured Embossing Plate" which is exactly like a Cuttlebug embossing folder, a bit bigger though. I looove it! The ribbon is PTI, and the paper is DCWV Winter stack (the glittery one), SU Old Olive and Chocolate Chip. A misc. Thank You charm is attached to the bow. Thanks for checking in!! Would love to know you were here, would you leave me a comment?!! Smiles!

Saturday, February 28, 2009

Thank You Card!

Supplies Used -- Ink: Pretty in Pink, River Rock. Paper: White CS, Me and My Big Ideas Fashion District stack. Accessories: Silver Satin Pearl EP, white satin 5/8" ribbon, Fiskars border punch, Fiskars Texture Plates set #4.
We had dinner with a couple of new friends at their house last night and we had such a great time, so the first thing this morning I got up wanting to make them a Thank You card. I had a peak at the IC over on SCS last night before going to bed so I kinda already knew what I was going to focus on. The Inspiration challenge this week is to create a card inspired by any of the items for sale from the great collection of stuff from Room Service Home. So I chose this bathroom stand "Conservatory Basket Stand $225". (No, don't plan on running out and buying that pricey thing any time soon LOL!!) I just liked the contemporary look of it, and our friend's home seemed to be decorated mainly in white contemporary furniture (it was so pretty) so this image helped me get started on the card. I stamped the "Classic Stripes" background stamp from SU in Versamark and used Silver Satin Pearl EP by Stamp a Mania for the background. Layered it with pink DP from Me and My Big Ideas (can't seem to put that stack away!!) and white CS that I die cut with Nestibilities Labels. The image is from SU Happy Harmony set stamped in Pretty in Pink. The Thank You sentiment is Fancy Flexible Phrases stamped in River Rock. To finish it off, I threaded white satin ribbon from Celebrate It through the bottom part of the card and added a bow. Thanks for checking in!!

Saturday, January 17, 2009

Saturday IC - The Coolest Shelf!

Supplies Used: Ink -- Glorious Green. Paper: SU Green Galore, White. Embellishments: Ribbon by Dots and Dashes (from Mike's) and Acrylic Sentiment (unknown). Tools: Flower Punch Tool kit, Cuttle bug, Punch Bunch "Begonia Petal Punch", SU "Looks Like Spring" punch.
The Inspiration Challenge over on SCS today is featuring PB Teen (Pottery Barn Teen). I found so much I want to buy there...but I finally zeroed in on this fantastic shelf for my inspiration piece! I LOVE this thing! I just think it is so cool, the way it looks like a shadow box or window and yet the "portrait" can change everyday if you wanted, just by changing out what you put on your shelf! I showed it to DH and he promises he'll make me some. So I'm telling everyone about his promise so I can hold him to it!! Anyhow...the card...the card...So I focused on the poppies sitting on the shelf...because ... I wanted to use more of my new flower punches!! Hee hee...!! I started by punching petals out of Regal Rose and Pretty in Pink cardstock using this humong-o (I don't know how to spell that) Begonia Petals Punch from Punch Bunch. Next I punched several different smaller flowers out of Summer Sun to use as the centers of the flowers. I wasn't really sure how I was going to make the centers (you'll notice they're all different!) so I just tried them all. I did a little sponging with some brown chalk ink on the edges of all the yellow centers. Next I "stirred" the petals (a legit term in flower shaping girls!!) with my nifty flower punch crafting tool (see yesterday's post) to get the paper fibers to break down a little and the edges to curl. Assembled 5 of the petals together by attaching them with Zip Dry glue to the Summer Sun centers. Used a fine felt tip pen to add some black dots to the centers (after all, they are supposed to be poppies!). Next I used a Glorious Green marker to ink up just the stem part of one of the flowers from the new SU Echos of Kindness Hostess Set (which is really a lovely set BTW) and stamped it onto a panel of Green Galore. Used my Cuttlebug Textile Embossing Folder to emboss a white panel so there'd be some texture to the "frame" and finally, I finished it off with a little teeny acrylic sentiment and dotted ribbon. So, what do you think?? Thanks for checking in all! Sweet Dreams! Anne

Monday, January 12, 2009

A Sweet Card

Supplies used -- Stamps: SU Sweet and Sassy, SU All Holidays. Paper: White, black, Marcos Paper Red, SU Patterns Pack DP. Ink: Versafine Black. Tools: Copics, Square Nestibilities, Sukura Gel Pen, SU Large and Small Ovals, black striped ribbon from Hobby Lobby.
I stayed very busy today playing with lots of new stamping stuff!! Not all of the experimenting ended up as a card that I liked enough to post, but I did have fun playing with everything! I made this card with no new stuff!! Wouldn't you know it?! Anyhow, it's for some friends of ours that surprised my DH and me with an Anniversary celebration. They invited us to spend a couple of days with them up at their lake house in Grandbury, TX, for New Years, so we thought it would be a fun way to spend our anniversary (we have been married 20 years this past New Year's Eve!). Turns out we were not alone with our hosts and at one point during the evening presents appeared and confetti poppers were going off and suddenly we were all celebrating our anniversary! It was really sweet and fun and we had a great time. This card is a Thank You for our friends for being so thoughtful and gracious to us. I stamped the strawberry from SU Sweet and Sassy set 5 times, colored them with copics, and then cut them out. Adhered them to 2 layers of Nestibilities scalloped squares, then a black panel, then a DP layer, and finally stamped the sentiment and punched it out with oval punches. The black panel has three faux red rhinestones (funny that I think I have to describe them as "faux" just in case you might think I'm handing out real ones --LOL!!), and then dotted all the seeds on the strawberries with Sukura Yellow Glaze pen to add a little texture to them. IRL the strawberries now have a bumpy texture, that's my favorite part of this card!! Thanks for checking in! Sweet dreams! Anne

Saturday, January 3, 2009

Cake Card!

There's a fun cake challenge over on SCS this morning! Be sure to check it out here. The inspiration pieces are cakes from the Cake Nouveau website. I jumped in and made a card inspired by the "Great Gatsby" cake from the website. My card really is more creme colored (to match the cake) than my photo reveals (Note to self, must get tips on photographing cards...). Supplies used: SU circle punches, half back pearls from SU Pretties Kit, 5/8" grosgrain chocolate chip ribbon Paper: Ruby Red, Chocolate Chip, and Very Vanilla cs. Stamps: SU Beautiful Borders (for the sentiment).

Saturday, December 27, 2008

Inspiration Challenge!

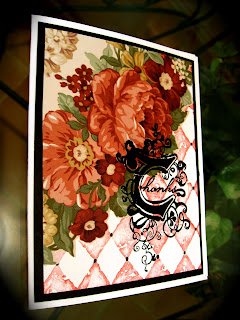
Oh it's great to be back to regular card making! This card is a two-fer: today's Inspiration Challenge -- see the inspiration info here MacKenzie-Childs -- and Joan Irvin's Doubledog Dare Challenge for this week. Joan wanted us to get out those Spring stamps -- flowers, butterflies, spring things!! I am so so glad to oblige!! I love flowery stamps, butterflies, and all things girly!! I made this card using some of my awesome wallpaper. Yes!! It's wallpaper from one of my many discontinued wallpaper sample books...and I'm gonna use it to death!!! You wait and see! I cut out a set of flowers from one of the wallpaper designs and placed it over a panel that I had stamped with Print Pattern from SU. Then stamped the "Thanks" from Illuminations in Versamark and embossed with black EP. Matted onto another black panel and it was done. Does this say Spring to you Joan? Sweet Dreams everyone!! Anne