Showing posts with label Quilling. Show all posts

Friday, June 11, 2010

Roses and Teacups!


Found a  a wonderfully-girly-frilly website for the Inspiration Challenge this weekend!  It's called Roses and Teacups and it was so inspiring to browse!!


I created my card based on this page of the coolest hats you've ever seen!!  All of them were over-the-top gorgeous, funky and fun, and all I could think of was I want to be invited to THAT party!!!  (LOL!!)


I used Webster's Pages Lullaby Lane papers (again!) for this card along with Nestibilities Labels #4 and Small Circle dies and "Persia" Cuttlebug Embossing Folder & Die Combo.


The "lacy" embellishment and scalloped border around the main panel in light pink were cut from the "Persia" die


I made the little roses on my card with a quilling kit from Quilled Creations. The sprays of pearls are from my stash here in my room, not sure of the origin, but probably from Mikes!

The sentiment is "Expressions" set by Inkadinkadoo stamped in ColorBox Chalk Ink, Dark Brown.
All the supplies for this card can be purchased at Fran's amazing supply store:  The Frantic Stamper!  Check out "Newest Products" listed!!  She is the best!

Note: No ribbons were harmed during the making of this card.
TFL, I'm so glad you stopped by!

Friday, July 17, 2009

Lucia's BD Card

Supplies used: SU Medalion BG stamp, Ranger Faded Photo ink. Very Vanilla and Soft Suede CS. Bow Easy and quilling tool
I really like to make special cards for my family. It's always something I focus on when I sit down to make a card. This card is for my sister, Lucia's, BD. She is an incredibly talented singer and teacher, has the most intelligent son and gifted daughter, that I always stress about making a special card for her. I LOVE this new medallion stamp from SU!. It makes card-making so easy, it's bold and elegant all at once. All I did was stamp the Medallion with Faded Photo Distress Ink by Ranger, added a center piece (the quilled flower that I had already made) and a satin bow (used the Bow Easy), and I knew Lucia's card was done!! Hope you like it!!

Sunday, May 17, 2009

Mother's Day Baskets and Wreaths

Hi There, Just wanted to show ya'll what I made my Mom, my 3 sisters, and my favorite Aunt for Mother's Day. I didn't photograph all of them, a couple of them were duplicates. These are based on the flower basket I made awhile back. You can find the tutorial here. The roses are quilled using this Spiral Roses Quilling Kit from Quilled Creations. All the punched flowers were made by various teeny flower punches and were pressed inward in the middle (while sitting on a mouse pad) with a small stylus. More details can be found on the original tutorial. Thanks for checking in!!

Sunday, April 5, 2009

And it's Featured Stamper day over on SCS! Great gallery to check out this week: Julie aka JustWriteDesigns. I love galleries where the stamper shares cards made with sculpted flowers. Julie apparently has a nice collection of punches and a talent for placing them perfectly on her cards! I went through her whole gallery twice, so much good work in there! Anyhow, this is her card that I chose to CASE: Spider Mums. So Purdy, huh??!! I used the same composition and that is about all, but my card is totally inspired by hers even though it doesn't look like it!! I made my focal point ("faith") using my Cricut and the Home Accents cartridge. Then I die cut it using Lables 4 Nestibilities. Took the negative space and die cut it again so it was a larger "hole" than the cut out in the middle, this gives it an illusion of being framed. Then I set out to make my flowers. Wish I had that Medium Sun punch that she uses!! (I have the mini and large but not the Medium sized one.) Any how, I made daisys using MS Layering Daisy punch. Each flower is created by punching 3 of the Layering Daisys, stacking them and glueing together. Once dried, I stirred the center with the narrow end of a paint brush handle to get the petals to bow up, then curled the petal ends downward. I punched a bunch of tiny yellow suns and put them into the middle of the flowers. Next I needed a pot for the flowers but I don't have any punches like that. I did have a Sizzix die from 100 years ago so I used that and cut out the smaller of the 2 pots that come on that die. I glued the die cut onto SU Wasabi and trimmed around it to make a background layer for the pot. I then made some strips of paper and curled them and attached them to the back of the pot with more glue and this time I added dimensional tape. I adhered the whole thing to a Me and My Big Ideas DP sheet. Got all that?! Thanks for checking in!!

Sunday, November 30, 2008

4 Cardinals, 3 Challenges, 2 Christmas Cards, and a Fun and Cool Award from My Friend Joan!!

Yah, you should be able to sing today's blog title to the "12-Days of Christmas" song...I'm humming... :) I have so much to post today. I'll try to be brief cuz I have lots of pictures!
First -- the 4 Cardinals! I am not nearly done with Christmas cards but I focused on two designs today. One of them was with the "A Cardinal Christmas" set from SU. Here's the 4 cards -- any of them stand out to you? I don't know which one to make multiples of for the give-away stash. Let me know, k?
Second -- I finished 3 Challenges today!! Personal best, record for me!! Here they are:
The first card is actually for next week's Doubledog Dare Challenge!! This was so much fun!! Bev (aka Beestamper) sent us a package of goodies to use for this challenge. We could use which ever parts we wanted but had to create a Christmas card with them. Check out all the fun stuff!!! ....and this cutie wooden mitten!!
I quickly grabbed the paper, ribbon, and stamps and made a couple of Christmas cards right away! I love love love that color combo!! The ribbon and stamps were so fun, this was easy peasy!! (The stamping is on the rose panel, didn't get a good photo of it.) Thanks for the wonderful goodies Bev, I will be using them more I'm sure!! The second card is a two-fer. It is for this week's Doubledog Dare Challenge that I hosted for our stamping gang. The challenge was to create a card inspired by either this Ugg Boot or this Ugg Boot! I chose this one (the first Ugg boot):
(The picture of the boot is not very good, you need to check the link of the first boot!)
and then made this card:
I paper fringed and quilled some flowers and leaves in colors to match the ones on the boot. I also used my cuttlebug scalloped dies to make some brown flowers, snipped the petals and layered them to make some large sized flowers. Stamped the sentiment from the "All Holidays" SU set, and glued down all the flowers and leaves sort of randomly to cover the card. Added a few white half back rounds to match the boot.
So, if you're counting, that makes 2 challenges. The 3rd one is using the same card above, and it is for a challenge that I am doing with one of my stamping pals, Joanne (aka Sleepy in Seattle). We are giving each other a month to use a specific unused, unloved, or forgotten tool or technique that we both never use that we once thought we had to have! This month we started out with quilling, and so this is my submission!! Check out the GORGEOUS snowflake card Joanne made for her submission (of course she was much more prompt in posting than I !!) Third -- Two more random Christmas cards I made this weekend:
The one on the left is a stamp designed by Judy Duke that I bought from a company called B&Js art stamps out of Las Cruces, NM. I stamped it with Green Stazon, colored in the pinecones with copics, added glitter and a shiny plastic bow, and stamped the sentiment using one of the cute little stamps from the stash of goodies Bev sent (see first challenge card!!). I really liked this one, I will be making a few more of these. The photo I posted isn't very good at all, but I posted it on SCS also, so if you want to see a better view of it, you can check it out here!
The card on the right was much simpler and faster. I used my Woodcut Wheel from SU to stamp the poinsettia background, then added layers of green, red, and some DP from HL. Glued on a little plastic poinsettia that I got in a pack from HL. The ribbon is SU wide grosgrain. Fourth -- and last, but not at all least...ta da!! Joan Irvin awarded all the Doubledog Dare bloggers a Kreativ Blogger award!! How cool is that? (See my cool new badge on the side bar!) Joan is a wonderful, sweet stamper friend of mine from here in Texas that I've never met!! She's super talented, a famous Dirty Dozen Alumni, and designs for several stamp companies. You have to check out her blog!! I am honored to be stamping with her and the award is such a thrill!! Thanks Joan!! Now to pay it forward.... how fun!!
The rules are:
1. The winner may put the logo on their blog. (Done!) 2. Put a link to the person who sent you the award. (Done!) 3. Nominate 5 blogs. (In progress...) 4. Put links to their blogs (In progress...) 5. Leave a message for your nominees. (In progress...)
The first person I'm nominating is Susan Conrad (aka One4Joy). This is one creative woman whom I admire both artistically and personally.
The next 4 are TBD! I'm just so new at blogging that I am still discovering new and amazing blogs everyday!! So stay tuned for updates to this list!!
Whew!! See, I told you I had a lot to post today!! Thanks for checking it all out!!
Sweet dreams everyone!
Anne

Thursday, November 20, 2008

Blogging in the Middle of the Week

Supplies used: Stamps - SU Pretty Peonies, Hugs and wishes.
Ink - Old Olive. Paper - Old Olive, Pumpkin Pie, SU Pallet of Prints 07.
Accessories - quilled flower.
This is my card for our Doubledog Dare for the week. Michelle (aka sf9rfan, Stop and Stamp the Roses) challenged us to case a card from the SU catty! What a GREAT challenge this was...I love casing. It's the best way to get stamping done!! So I decided I was going to flip open the book and case what ever it opened up to. I landed on page 48. OK, maybe not. I ask you, who has time to make 18+ little boxes and alphas and string them up to make a swag? Not anyone in my stamp room!! LOL!! So, I took a more reasonable approach and tried again. This time I browsed through the catty and found a page with a stampset that I own on it. Yahh, there you go....Pretty Peonies -- Page 88. Now this was fun!! I happened to have a spare orange quilled flower that I made awhile back to use with the color combo the card featured, so I was good to go!! Finished this in just a few minutes...awww, now that's stamping I can handle at midnight!! Thanks for checking it out all. Sweet dreams! Anne

Monday, October 13, 2008

Bringing Stamped Images to Life

See list of supplies used for this project below.
I love dimension and texture on my cards. I love "girly" cards with flowers. I don't understand when someone says "I can't get that stamp set, I already have too many flowers." What?
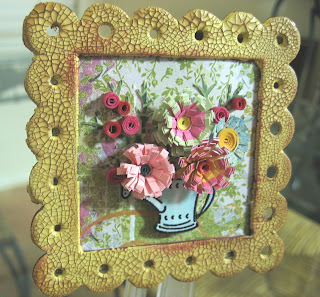
This little project here is a 3x3 framed bouquet of flowers brought to paper-life.(It's DS's BD present. Good thing I haven't told her about my blog yet.)
To make the frame stand (the back), I started with a coaster and chopped it up to get a piece measured 2-1/2 by 2-1/2". I cut one of the left over pieces of the cut-up coaster to 1-1/2 by 1-1/2. Scored the little 1-1/2" piece about 1/2 inch down. Then attached it to the 2-1/2" piece with some big brads to create the frame stand. Covered the front side of the frame stand with Basic Grey Perhaps paper. (Note, the frame stand at this point does not have the scalloped frame attached yet -- this photo is showing what the back looks like after it's all done.)
For the flowers (the centerpiece), I first stamped the flower can from SU Itty Bitty Bouquet (yard sale find thanks to my DS Tina -- the BD girl) onto white cardstock using Black Brilliance Ink. I embossed it with clear EP, then colored it in with copics. After cutting it out carefully (just the can, not the flowers), I added a dimensional to the back of the can and adhered it to the covered side of the frame stand. From there, I punched 2 fern things (I don't know what they're called, they're all the rage these days) out of scrap green printed paper and glued them down so it looked like the were coming out of the can. Then I began fringing paper again. I LOVE my paper fringer. It got lost in the black to-do hole that is my stamping room and I happened to pull it out recently and now I want to add fringed and quilled flowers to everything!! (Hmmm...maybe I'll do a tutorial?? What do you think??) Anyways, this was the easy part, it didn't take very long to come up with a bunch of little flowers and I just picked out a few of them and arranged them on top of the fern things. I quilled a few dark pink buds (I don't know the technical quilling term for those little guys) and used them to balance out the arrangement.
Finally the Scalloped Frame. I first painted it with some Burgandy Rose acrylic paint and let that dry (maybe 10 minutes). Then I covered it pretty thickly with Ranger Distress Crackle paint in "Scattered Straw". This stuff is really cool!! Once that dried (about 20 minutes), I lightly brushed some of the drying Burgandy Rose paint, that was still on my sponge brush, over the crackle to highlight the effect. I love that vintage look!! Yeah Tim Holtz. Someone give that man a cigar. Once I was sure the whole thing was ready, I glued on the frame, over the flowers, to the frame stand.
I even have a bunch of cute litte fringed flowers left over for another project.
Here's the supplies used:

Stamps: SU Itty Bitty Bouquet; Ink: Versamark Brilliance Black, Copics, Burgandy Rose acrylic paint, Ranger Distress Crackle Paint in Scattered Straw; Clear EP, Basic Grey Perhaps DP, Fern Punch, paper fringer Flowers anyone?!

Sunday, October 5, 2008

World Card Making Day (WCMD)

Supplies used: Paper: Bazzil Places We Love, PTI Summer Sunrise, SU Only Orange and Soft Sky textured, Marcos Paper Cardinal Red. Stamps: SU Celebrate Everything, See D's Flourishes Ink: SU Real Red Craft Accessories: Clear EP, paper fringer, quilling paper, Basic Grey ribbon, Cuttlebug Swissdots folder Yes, indeed. There is such a thing as World Card Making Day!! Yesterday, Oct. 4 was the big day. And it just so happened that we had nothing planned for Saturday which meant I could stamp all day!! For a stamper, the options are endless. Stamp companies have contests, on-line stores have sales, websites and bloggers have challenges! It's like a virtual Disneyland! SCS had WCMD Virtual Stamping and posted a challenge every two hours. I dug in and stamped as fast as I could. I even did the Inspiration Challenge and the Featured Stamper Challenge this weekend. A personal best! Anyhow, the mojo was flowing so I went with it. On Sunday I sort of peetered out (that's so cool, I can say peetered because it's my blog) but I had nothing. Apparently I had stamped my quota. Good thing because there was church to go to, laundry waiting, a blog to create, and even dinner to make. Yes, it is a charmed life. All the cards I did for the WCMD challenges can be found here. But just because I want to try posting a card for the first time on my new blog, I posted my fav of all of them above. Hugs, Anne