Showing posts with label Birthday. Show all posts

Wednesday, April 6, 2016

Birthday Blessings Made from Left-Behind Pieces


Hello all!

For today's card, I went through my Heartfelt Creations stash of "leftovers" -- pieces and parts that I started out using but somehow they never materialized into a card or project.  Let me just confess right now that I have a "lot" of left-behind pieces to work with LOL!!


Hiding in my piles were quite a few Majestic Morning die cuts.  My at-the-time, all-time favorite (before all the new all-time-favorites followed!).  Since some were already colored a rich purple, I decided to pair them with the Italiana Riviera collection because the beautiful papers featured purples, grapevines, wine and such. 


I shaped and assembled as many flowers as I had die cuts, and colored  them with Viva Decor Violet 3-D Stamp Paint.  Then I selected a card panel with a vineyard scene from the paper collection.  I decided it "must" also have some sort of  pavilion surrounding the landscape scene and went with two of the Raindrops on Roses die cuts.  All edges were aged with Vintage Photo Distress Ink.


It was quite satisfying (and fun!) to actually use up the pieces I had said I'd save for "another time"! Take a look at your stash and see what you come up with!  Thanks so much for stopping by today!  Be sure to check out the Heartfelt Creations blog where this card (with all the details), along with many more gorgeous samples from the DT are posted!

Have a blessed week!
Anne

Thursday, April 2, 2015

Butterfly Garden Card

Hello and Happy Easter Week!!

Today I'm sharing a card that looks alot more complicated than it is! I even kind of suprised myself when it was done (LOL!) because it hardly took any time to make! I created it for this week's Heartfelt Creations Blog Post which you can see here.


I started with this really pretty Spellbinders card background die (Nestabilities Card Creator Dies - 5 x 7 Mystical Embrace) and die cut 3 panels from white cardstock.  I die cut a 4th panel from designer paper.  I scored one of the white die cut panels about 3/4" from the top, added glue to the area above the score line, and adhered it to a second white panel to form my card base.


I then glued the designer paper panel over the card base, and finally adhered the third white panel on top of the designer paper with foam dimensional squares. I lightly sponged on some purple ink to the top white die cut panel.


Once the card base was ready, I cut a sentiment strip from the designer paper and curled it with the edge of my scissors - like you would for curling ribbon on a package.  I threaded it in its curled shape between the top two layers of the card base and glued it down at the points where it made contact with my card base.


Next I die cut and shaped my Heartfelt Creations flowers, leaves and butterflies, attached them as shown - pretty random.  And that was it!

It's amazing what happens when you use HC products!  I'm always so pleased with the results, I hope it inspires your own creativity!! And speaking of inspiration - you must check out the Heartfelt Creations Blog this week!! So many gorgeous projects!!  The Design Team has hit their stride with amazing creations!!

The Heartfelt Creations products I used today:

HCD1-759 Butterfly Medley Die
HCD1-758 Botanical Wings Die
HCD1-736 Classic Leaf Die
HCDP1-251 Butterfly Medley Paper Collection
HCPC-3650 Butterfly Medley Cling Stamp Set
HCPC-3651 Botanical Rose Cling Stamp Set
HCpC-3545 Open Leaf Cling Stamp Set
HCST1-401 Deluxe Flower Shaping kit
Spring Bling Prills
Art Institute Glue - Dries Clear
McGill Flower Shaping tool kit

All of them can be found at https://www.heartfeltcreations.us/product-home

Thanks so much for checking in this week!!  Have a blessed Easter my friends!


Sunday, September 21, 2014

Blooming Party

 Hi All,

The supplies for this card today are mostly all dies and paper.  The variety of dies out there is just mind boggling!  How do you choose??

I started by die cutting white CS and SU DP with Simon Says Chevron Pattern die.  I used the white die cut as my background on a cream CS base.  Then I randomly glued individual chevron pieces from the SU DP into the negative spaces of the white background.

Next I die cut a couple of "Lacy Leaves" from SU Blackberry Bliss CS.  Followed by the "Party" block piece by Little B in gold metallic paper.

The flower was made using SU's Beautiful Bunch punch and matching stamp.  I stamped the flower twice in Hello Honey ink and punched them out.  Sprayed them lightly with water and pinched and shaped them using my flower shaping tools from Heartfelt Creations.  For the center of the flower I die cut two of the stamens from Heartfelt Creations Arianna Blooms set using Blackberry Bliss CS.

For the final assembly, I added a strip of coordinating SU DP across the lower middle of the card base and arranged all my pieces onto the card.

TFL, I'm so glad you stopped by!

Saturday, August 9, 2014

More Heartfelt Creations Flower Cards


Here's some of the the other cards I've been making with Heartfelt Creations dies... I'm so in love with these dies!!  Hope you enjoy!


This first card is made with the Majestic Blooms set. I stamped and die cut my flowers, shaped them and colored them using Gold and Red Viva Stamp paint. (OMG that paint is so shimmery!!)  I stamped the coordinating pre-cut stamp set image onto my vanilla cardstock and colored it in with Copics.  I then used the stamped image as a template to arrange my flowers.  I added a pull-ribbon bow to bulk up the arrangement.  Underneath the arrangement, just for added texture, I die cut an ornamental piece from the HC Timeless Amour die cut set.  I stamped my sentiment, rounded the corners and the card was done!


The next two cards are pretty simple and so quick and easy to make!  Both feature flowers I made with the Arianna Blooms and Arianna Lace dies sets. Definitely my favorite HC release so far!

When I made the flowers for the next two cards, I added color with more of the Viva Stamp Paints.

For card above, I stamped an image from HC Delicate Asters and Butterflies pre-cut stamp set onto a neutral patterned paper layer,  I used a brown marker to color in a little bit of the image and added some red rhinestones on either side.  I centered my Arianna Blooms flower over the image and stamped my sentiment.  I layered the panel onto a white cardstock base to finish the project.


This card is basically the same, except I "amped" up the sentiment more than the flower. I created the panel from a vintage news print patterned paper, then a brown cardstock layer and adhered them to a creme cardstock base. I rounded all the corners with 1/4" corner punch.

For the sentiment, I used a stamp set from Just Rite Stamps and stamped it twice.  I die cut one of them with a scalloped oval, then from the second image, I cut the word "Fabulous"  from the sentiment and popped it up over the scalloped oval.  I added a little Arianna Blooms Lace under the scallop and distressed all the edges on the card. 

TFL, I'm so glad you stopped by!

Sunday, June 8, 2014

Filigree Bow Cards


Hi Friends,

These cards are made featuring a couple of Filigree dies I recently purchased from an Etsy Shop called PNW Crafts. I stumbled across them while searching for the bow die because it happens to be hard to find right now since it's not made in the US.  This shop had one left, along with quite a few other goodies, that I loved so much I ended up making a pretty large purchase.  (oops!)  The stuff came in 2 days!  I'm telling you, you can't get better service! "Shout Out" to PNW Crafts!!


The baby card is made with the small filigree bow designed by Sue Wilson for Creative Expressions.  The die set comes with dies to make two sizes of bows and accent ribbon.  Additional dies used were Marianne Creatables LR0269 lattice dome and 0218 baby carriage dies. I embossed texture on the bottom of the front panel with an EF and accented the bow with a decorative button.


 The birthday card is made using two of the large-sized bows in the set.  I made one complete bow and adhered it to the card, then I made a second bow and cut it in half and adhered one half to each side of the first bow to give the illusion of a double bow. I accented the bow with a small white flower. 


The circle doily is made using Heartfelt Creations Raindrops on Roses set (which I also got from PNW Crafts).  The sentiment and frilly stamped frame in the center is Just Rite Designs "You Inspire Me" stamp set.  I finished off the embellishing with some rose-colored pearls scattered around the design. 

Here's photos of the dies I used.


TFL, I'm so glad you stopped by!

Wednesday, June 4, 2014

An Inky Background - Tim Holtz Mini Distress Ink Pads


Hi All,

The watercolor technique on this card is fun to play around with because you can't predict what you'll end up with, but the result is always unique and surprising!

I tapped some Tim Holtz distress ink pads randomly and directly onto an acrylic block, sprayed with lots of water so it started to blend, then pressed it onto my white cardstock panel. It was easy to get a variety of colors using Tim's new mini ink pads.  Their tiny 1"x1" size makes it easy to fit lots of color onto a block for this technique.  

After the background was completely dry, I layered it onto black cardstock, then stamped my images (Candles from Inkadinkadoo Birthday Sentiments) and sentiment (Hero Arts Essential Messages) using Versafine Onyx Black ink.  Added a tiny bit of yellow glitter to the flames of the candles and then mounted the finished panel onto white cardstock base.

Good as done!!

TFL, I'm so glad you stopped by!

Saturday, October 19, 2013

Altered Matchstick Holder


Happy Weekend Everyone!

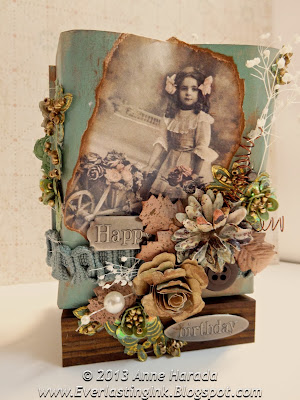
This is a vintage matchstick holder that I altered as a gift for my sister Tina's birthday.  (The picture on the left is NOT the one I altered but I forgot to take a "Before" picture so it's just a sample of what they look like when they're in the original form.)  The one I used was unpainted, bare metal and banged up; nothing as nice as the red one in the photo!! LOL!


I painted the bare metal with a base coat of gesso, then dry brushed Turquoise and copper acrylic paint over it until I was happy with the faux rustic, patina color.  I downloaded a sheet of vintage images from this Etsy shop and chose one of the photos of a little girl with a flower cart to use on the back.  I printed it out, distressed the edges then glued it to the back of the holder.  I also added a faint smudge of TH "Worn Lipstick" distress ink on the flowers.


Next I picked out some vintage trims from my stash that matched the color scheme and glued them around the holder.  From there, I went through my stash of paper flowers and chose different ones that I thought went with the trims and the overall color scheme.


After getting those glued on, I chose to use this cute little straw and paper barn owl that I got from Hobby Lobby. It came on a card of three in the natural flower supplies section.  I just positioned him on the front of the holder and added more trims and flowers.

I also used some natural white flower-bud sprays that I got from the same section at HL along with some brown wire that I coiled, and just inserted them behind and among the flowers and trim.


Finally, I had these small rustic tin birds, that I picked up in Santa Fe during the same trip home this summer, that I wanted to use on the holder.  I added a tiny satin rose and feather to the front of one of them and glued a strong magnet to the back.  So now it comes off and can be used as a note holder on the tin or just completely separately. 


This is the holder without the little bird:

The back side showing the vintage image and some metal tags saying "Happy Birthday"
The only problem I had was getting it to sit on the table top without falling backwards!  It kept falling over when I put pens or scissors in there as a test to see if it would hold anything. Because it was originally designed at an angle to hang on the wall - that would allow the matchsticks to roll forward so the well stayed full - it would not stay standing!! Boo!!  So Carl, my amazing husband to the rescue.  He cut a piece of heavy wood as a base to accommodate the slant, screwed it onto the bottom, and now it is the perfect little desktop tin holder!  I love it!!

Here's some photos from other angles:
You can see here how much of an angle the slant was at.


View from the top - You can see how it is banged up in the back
My "vision" of it being used as a desktop accessory for pens and business cards!
Hope you enjoyed this post!

TFL, I'm so glad you stopped by!