Showing posts with label Christmas. Show all posts

Tuesday, August 9, 2016

Snow Kissed Card in a Box


Hello Again,

I have the pleasure of showcasing the newest release from Heartfelt Creations today, "Snow Kissed"! A perfect companion to last month's Celebrate the Season -- more dies, more stamps and a whole new color palette!
Bring out the softer side of old man winter in all of your projects with the new “Snow Kissed” Collection by Heartfelt Creations.  An exquisite blending of classic winter scenes depicting gentle snowfalls, candle lit windows, countryside sleigh rides mixed with a sprinkling of fun filled images of frosty snowmen delivers the perfect compilation of winter themed imagery for all of your holiday and chilly season creations.  This newest collection features three cling stamp sets revealing illustrations of towering pine trees and frosty snowmen ideal for creating spectacular winter scenes, a large gift tag perfect for adding that special handmade touch to all of your beautifully wrapped gifts, as well as a wide variety of snowflakes which when paired with the coordinating dies will allow you to build one of a kind dimensional flakes as realistic and individual as those in a gentle snowfall.  The charming paper collection showcases beautiful hues of cozy blues and rich pine greens accented with deep burgundies creating exquisite backdrops to showcase patterns of elegant snowflakes, windswept swirls, playful polka dots and beautiful brocades resembling those found on a cozy handmade quilt.  And, this unique collection brings with it a special surprise…a small gift box die ready to be cut, assembled and embellished, making packaging smaller gifts quick and easy during the busiest time of the year!  So, grab your quilt, cozy on up in your craft room and join us as we bring just a kiss of snow to your craft table….we promise no shoveling required!

The card I made features the Spruce Trees die and some decorative, natural foliage to create a winter scene in a box! I stamped each of the trees twice onto dark green patterned paper from the Snow Kissed Paper Collection and die cut them with their coordinating dies.  I then covered them with a thin coat of Dries Clear Gue and crystal glitter.


After assembling all my pieces, I inserted the card into a clear Heartfelt Creations box and added more die cuts and embellishments to the outside. 
All the step by step details for this gift box are on the Heartfelt Creations Blog today!  Head on over to check it out along with some fantastic cards and projects made by my incredibly talented Design Team Members!!

Thanks so much for stopping by today! Have a Blessed Week friends!!
Anne


Tuesday, July 19, 2016

Christmas Card in a Box

 Hello Friends!

I made several of these "card in a box" cards with a couple different Heartfelt Creations collections -- the one I'm sharing today is with the Celebrate the Season collection.  Just a wonderful color palette and of course Poinsettias, so what's not to love??

Here's a closeups of what's inside:

The main thing to remember is to create the card first, then insert it into the clear box, and then add the frame or additional embellishments to the outside of the box so you can see how they align with your card.  Here's the card that is inside the box:
See what I mean, jelly bean?  :)

Step by step instructions are on the HC Blog today!  Check it out and you'll find lots more inspiring creations by the amazing Design Team!!

Thanks so much for stopping by today! Have a blessed week!!

Anne

Tuesday, July 12, 2016

Heartfelt Celebrates the Season


Hi Friends!

July reminds us that Christmas is only six months away!!  And to get a fun jump-start on making your cards this year, like you always say you're going to do "next year" (lol!), Heartfelt Creations is releasing "Celebrate the Season" collection today!!
"The time has come to once again “Celebrate the Season” with Heartfelt Creations!  Non-traditional in color, this new holiday themed collection showcases an assortment of exceptional winter hues…shades of teals, pinks, greens and violets resembling the northern lights, whites as crisp as freshly fallen snow and ice blues mimicking frozen ponds beneath the blades of gently gliding ice skates.  Four fanciful cling stamp sets filled with old fashioned themed illustrations of ornate sleighs, wooden gates, gifts, skates, mittens, and simple wreaths filled with poinsettias and greenery, along with an assortment of charming sentiments will bring feelings of nostalgia from Christmas past to all of your crafty creations while being paired with the contemporary color palette of Christmas present.  Three coordinating sets of dies will have you creating your very own dimensional embellishments perfect for holiday cards, layouts and altered art pieces.  Join us as we “Celebrate the Season” and get an early start to all of our holiday themed creating."
The color palette for this holiday collection is wonderful! I love the non-traditional pastels that are featured. They're cheerful and feel "cool", and here in Texas, that's just about perfect timing right now!

I went for a little more of a vintage feel for my first card from the collection.  Just because the images seemed more from a days-gone-by era.  Good times... The collection has some mini poinsettias to die cut and color, so it was fun going for an unconventional lavender color for my poinsettias.

There's lots of fun winter-y images that you can stamp and die cut to add to your projects, or you can diecut pre-colored ones that come with the papers collection like I did here.  I distressed them with Ranger Tea Dye ink to coordinate with the rest of the card. 

Be sure to check out the Heartfelt Creations Blog this week! Step by step instructions and a list of products I used are posted there. Plus lots of fun samples and beautiful inspiration using the new collection!!

Thanks so much for stopping by today!  Have a blessed week!
Anne

Sunday, December 20, 2015

Poinsettia Christmas Tree

Hi Friends,

Oh my it's truly Christmas time!  Are you busy decking the halls and hanging stockings by the fire place with care??

I created this Poinsettia Tree using the Sparkling Poinsettia Collection from Heartfelt Creations.  Had such fun with this that I ended up making 6 more for family members!!  The finished tree stands about 22" tall with the star on top.

It was impossible for me to capture the full tree in one photo, so these are not very good shots but hopefully you get the idea!


I started with a paper mache cone that I purchased from Michaels.  I covered it with paper from the paper collection.

Next I created poinsettia flowers using the stamps and dies from the collection.  I stamped them all onto red cardstock with black ink. 

I also stamped and die cut leaves from the collection for the tree.  After creating all the flowers and leaves that I thought I might need, I wound ribbon around the entire tree then filled in the rest of the space on the tree with my poinsettias and various other Christmas themed embellishments that I some how seem to collect every year.  This was a great way to use some of those up!!

I used mini shinny red and gold bows, mini pinecones, glitter styro-foam balls, ribbon and various buttons and trinkets to fill in the spaces.


For the tree topper, I die cut 5 snowflakes from the Arrianna Blooms collection from sparkly white glitter paper.  I creased the snowflakes then glued the together to create a 3D star. 


Finally, for the tree skirt, a created a large rosette from the paper collection and wrapped it around the bottom of the tree base! 


Hope you enjoyed the photos and possibly gave you an idea for next year on how you can use up some of those little Christmas embellishments that seem to secretly multiply while in hibernation through the year!!


Thanks so much for stopping by today!
Anne

Wednesday, December 2, 2015

A Christmas Dress

 Hi Friends!

How are the holiday preparations going this week?  I hope you're farther ahead than I am!!

My Heartfelt Creations card this week is a gate-fold card featuring the new large oval decorative die and ruffed dress from the All Glammed Up collection.


I created a gate fold card base and adhered the decorative lattice oval to the left side and the mirrored oval panel to the right.


Next, I created a bunch of small little rose knots from red paper strips that I curled up and used them to decorate the dress following the stamped image's pattern.  I also die cut small leafy vines from the Cut Mat Create die set to include with the little roses.


The detailed step by step instructions to make this card are posted on the Heartfelt Creations Blog today!  Head over and see a ton of different ideas using the All Glammed Up collection!  

Thanks so much for stopping by today!

Wednesday, August 5, 2015

100+ Degrees -- Let's Talk About Christmas!


Hi Friends!

We're hitting our stride here in Texas - going for 100 PLUS degrees everyday for the next two weeks.  Sunday we should be up to 107 according to the weather guy!!  What better time to talk about Christmas!!  Snowmen, fire places with stockings, hot chocolate, lots of wrapping and card making!!  Wooo Hooo!!


Today's cards are made with the Heartfelt Creations Sparkling Poinsettia Collection that I have devoured!!  It's such a great collection to get you going on your Christmas cards, quick and easy and many very elegant!  I just can't say enough about how easy it makes the task of creating multiple cards!!


Be sure to check out the HC Blog this week!!  Not only are there many more creative samples for you to enjoy, but there's also a sneak peak at the August collection (HOORAY!!) coming next week!  I'm beyond excited about the new one -- It is amazing and totally different from what you're used to seeing from HC!!  I know you'll love it!!

Have a blessed week everyone!!   Thanks so much for stopping by today!

Anne


Wednesday, July 29, 2015

21 Weekends Until Christmas!

Hi Friends!

I have another Christmas Card to share today featuring Heartfelt Creations "Sparkling Poinsettias" collection!  I am here to say that with the amazing paper, stamps and matching dies that you can get with this release, it is no problem to have a cards created and ready in a lot less time than it looks!  This card took me about 45 minutes including the photos and the writeup! Awesome-ness!  :)


I used two different panels from the paper collection, two poinsettias made with gold foil cardstock and green seed beads, and a little banner that I created just from scrap papers and embellishments. Easy peasy!  The patterned papers and card panels with sentiments do all the work for you!
You'll find all the step by step details for my card on the Heartfelt creations Blog today - and lots more beautiful Christmas projects: cards, layouts and some really fabulous 3-D projects!! Be sure to check it out!!

Thanks so much for stopping by today!

Anne

Wednesday, July 15, 2015

Sparkling Poinsettias

Hi Friends,

Wednesday is here again and I have a couple of "Sparkling Poinsettias Collection" projects to share!  Love this collection, love the poinsettias and the paper!!  Sigh....

I started by creating all my poinsettia flowers first.  I stamped the Sparkling Poinsettia Cling Stamp Set twice with Peanut Brittle ink onto Blushing Bride cardstock.  I die cut all the petals and glued them together to make four different sized flowers.  I sponged all the petals with a light coat of diluted Carmine Red Viva Stamp Paint and added Stickles to the edges for sparkle.  I had the hardest time photographing these for some reason. It's probably the photographer...;)  Couldn't get the shimmer and sparkle to show up the way they look IRL!

For the card, I stamped the Sparkling Poinsettia Notes Cling stamp background with Versamark ink and heat embossed it with gold and Blushing Bride embossing powders.  I adhered the poinsettias to the panel using the image as a guide for placement. I added some gold, lacy fronds that were die cut using the Arianna Lace die set.

The ornament was made using the largest poinsettia flower which I hot-glued onto the snowflake.  (I purchased the snowflake in a set of 10 from Hobby Lobby after Christmas).  I stamped some leaves onto green patterned paper from the paper collection with Versamark ink and heat embossed them with gold EP,  I die cut them out with the matching dies and attached them under the flower on the snowflake.

I finished both projects with some sparkly green Christmas wire binding that I curled and tucked under the flower petals, a lacy ribbon and mini styrofoam balls to the centers of the flowers.

Here's a list of the Heartfelt Creations products I used:
HCDP1 256 Sparkling Poinsettia Paper Collection
HCD1 766 Sparkling Poinsettia Die
HCPC 3680- Sparkling Poinsettia Cling Stamp
HCD1765- Sparkling Poinsettia Die
HCPC 3684 Sparkling Poinsettia Notes Cling Stamp
HCD 744 Arianna Lace Die
Viva 3D Stamp Paint Carmine Red Metallic
Hope you'll take a quick look at the HC Blog today, lots of gorgeous projects and inspiration using the Sparkling Poinsettia Collection as well as several other collections.  These so much to see!

Thanks for taking time to visit!  I appreciate it!!
TFL, I'm so glad you stopped by!

Wednesday, July 8, 2015

Heartfelt Creations Christmas Release!

Hi Friends!

For those of you that have any inkling of crafty-ness on the brain, then you know that July is the start of the Christmas count down!  It's only "weeks" before all those gifts have to be handmade, those cards hand-stamped and addressed, and all those packages have to be in the mail!  And for those of you that sell to those of us not organized enough to make all those wonderful crafty items, you've got all the craft shows and Etsy shops to fill up too!  So Christmas in July is a blessing and a curse!!  A blessing because the earlier we start the better.  But a curse because you know from now until January you will be crafting ideas in your head if not creating them in your studio!!  I know...trust me!!

But the good news is... the wonderful new Heartfelt Creations "Sparkling Poinsettia Collection" has arrived to help get you started!  Yippeeh!!
Rediscover the majesty, serenity and pageantry of Christmas with Heartfelt Creations' Sparkling Poinsettia Collection.  This glorious ensemble of stamps, dies and papers captures the stately splendor of Christmas with a regal color palette of burgundy, evergreen, taupe and cream.  Radiant poinsettias take center stage amidst a host of traditional Nativity scenes, twinkling candles, drifting snowflakes, lacy flourishes, exuberant banners and Heartfelt  greetings that are worthy of the King of Kings.  Six detailed stamp sets echo the glorious images found in the paper collection and two coordinating die sets can be used to create sparkling poinsettias that will never wilt or fade.  Chronicle sweet memories of the season, share holiday joy with family and friends, hail the holy babe born in the manger and deck the halls with Sparkling Poinsettia!

Use it to create your own gorgeous poinsettias in beautiful holiday colors and many different sizes and you'll have the basis for lots of gifts, gift packaging and personal cards ready for giving away (or selling!!).  The paper collection that goes with this release is beautifully traditional, easy to create with and wonderfully inspiring!  You're going to love it!


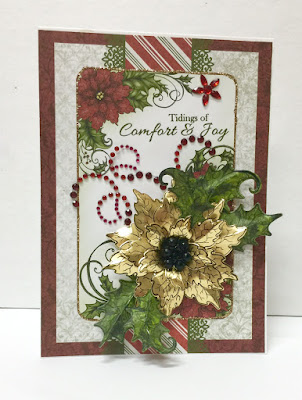
The card I made this week uses the new Paper Collection, a single background stamp and a medium sized poinsettia die cut from shinny gold foil card stock.  The background stamp is a quick way to create a wonderful traditional holiday scene that comes together quickly and can be used many different ways.  My step by step instructions can be found on the HC Blog.
Here is the list of the HC products I used:
Sparkling Poinsettia Paper Collection
HCD1766- Sparkling Poinsettia Die
HCPC 3683 - Joy to the World Cling Stamp
HCPC 3679- Large Poinsettia Cling Samp
HCPC 3680- Sparkling Poinsettia CLing Stamp
HCD1765- Sparkling Poinsettia Die
This week on the HC Blog you'll find a new video from Emma Lou and lots more samples of gorgeous cards, layouts and projects you can make with the new Sparkling Poinsettia Collection.  Be sure to stop by to see what the Design Team has been up to!!


TFL, I'm so glad you stopped by!