Showing posts with label Markers to Glossy technique. Show all posts

Friday, March 9, 2012

Inspired by a Hand Fan!

Hi Friends,

This card was inspired by the web store called "A Cool Breeze - Fashionable Hand Fans".  I found the website while surfing around for an inspiring site for the IC this weekend over on SCS.

I chose this fan by "Chiang" as my inspiration. I set out to recreate the wonderful color scheme using Tim Holtz Distress Inks on glossy paper.


I stamped and cut out the Hero Arts "Daisy Blossom" stamp onto Eclipse paper to create a mask of my daisy and laid it on the glossy panel.


I sponged on my distress inks pretty randomly, but referring to my inspiration piece as, well, inspiration!

I removed the mask to expose the white space.

Next, I tested different colors of browns on another glossy panel to determine which ink I wanted to use for the daisy.  Because ink tends to act and look different on glossy than on regular CS, I wanted to be sure I chose the right color for my project.

Once I decided on the ink to use (I went with the SU! Chocolate Chip), I inked up my daisy image and stamped it over the white space.

I completed my card by adding a rust and brown-colored punched circle to the center and then stamped my sentiment using the same SU Chocolate Chip ink.  I layered the finished card onto Really Rust CS and then onto my white card base with dimensionals.

TFL, I'm so glad you stopped by!
 

Friday, March 2, 2012

A Boy Card!


Hi Friends!

This month I'm working on boy cards - a wide spectrum of ages from not-really-"boys" any more (i.e. HS and college teens) to over the hill 50+ geezers LOL!  Egads!! What am I saying, I'm over 50!!

I created this Star card by casing a card by Lynn Mangan from the March 2012 Cards mag.  The sketch and color scheme are pretty much the same, as the published version, so it was hard to go wrong!  I used SU punches, Basic Grey DP, Recollections bling, AC buttons and the sentiment is SU.
Stamped image is "Floral" by Rubbernecker stamps. Sentiment by SU!

This next card is super simple for the IC this weekend.  The inspiration website is "Superfine Bakery" and I chose this cake as my inspiration piece.  I used SU Markers direct-to-rubber onto glossy.  Added 3 rhinestones and the sentiment and I was good to go!  I stamped the envelope with the residual ink still left on the stamp, just a couple of huffs on it and it made a very nice ghost impression on the envy.

TFL, I'm so glad you stopped by!
 

Friday, October 7, 2011

Hello!


This card is for the IC this weekend 'cause I'm hosting again!  I've been looking for a cover for my iPhone lately and came across this website called "Gelaskins" while surfing. Lots of "artistic" work to choose from so it was hard to settle on just one that I liked. I finally went with this print called "Bloom". I liked the color combo and the simple design so I tried to keep with that concept.


My background is glossy paper sponged with distress inks by Tim Holtz. I stamped the bare trees with StazOn ink, sponged a deep pink across the top of the trees and added a few white dots with a white gel pen. The ribbon is some scrap satin ribbon tied with Bowdabra wire and curled a bit.  (Side note -- the Bowdabra wire is so much easier to use than standard craft wire, makes it really easy to create a simple bows; sometimes it's the little things that make a difference, right??).   The ribbon truly is a dark pink magenta that matches the trees IRL!  I added a Websters Pages "Little Whimsies" resin heart embellishment to the middle of the bow after gathering it with the wire.

I hope you'll be inspired by the website! Come join in this weekend!!

TFL, I'm so glad you stopped by!

Monday, September 12, 2011

Inset Frames - One of A Kind (not!)

Hi Friends!

This weekend flew by, I stamped a little, ran errands, stamped a little more, went out with friends, stamped a little, did housework and laundry, stamped a little more, shopped, stamped a little more, hung out on the internet, stamped a little... whew!  Busy!!  LOL!

This card started out as a card-front that I didn't know what to do with.  I stamped it several weeks ago using the same Markers to Glossy technique that I use a lot (see this link)!

I ended up using 3 of my Rectangle Nesties to cut my image into 4 separate pieces.  I separated out the pieces and prepared them for reassembly!


First, I stamped a sentiment from Stamps of Life "You Are Too Kind" set on the center piece and added adhesive foam tape to the back of it.  I then added foam tape to the middle frame piece. 

Then, I began the reassembly!  I laid down a piece of Pacific Point CS first, then the outer frame of my stamped image.  Next I adhered the raised frame with the foam tape inside of that piece.  I continued with the next two pieces until the image was reassembled.  I attached the whole thing to Old Olive card base and added swirly bling rhinestones by Paper Studio.


TFL, I'm so glad you stopped by!

Monday, July 18, 2011

Masking on Glossy Paper

 Hi Friends,

Me (left) and Bev Gerard


Went to the local Rubberstamp show this weekend with my stamping buddy Lou (Stamp Cat Creations) and enjoyed shopping with her and being amongst all our other homies!  Stampers really truly rock, don't you know?!  Shout out to Joan (Stamping with a Passion) and Bev (Savor the Journey)!!  Loved visiting with ya ladies!!

This is a pic of me with Bev who was working the Rubbernecker Stamps booth along with Joan. So much fun!!  I always wish I had taken more pictures! 


At the show, one of my fav vendors, "Local King Rubberstamps" had a booth there this weekend. The designer was demo-ing several different techniques using glossy paper including the technique I learned from them last time I saw them.  It's one of my favs and I've blogged about it and used it many times. You can click on this link "Markers to Glossy Technique" (I made up the name, I don't know what it's official name is!!) to see the many times I've used that technique!

I was wowed by the way she was creating a blended, colorful background using regular make-up sponges and water-based inks directly onto glossy paper.  She used a mask to create the "sun" and once the mask was lifted, filled in the blank area with yellow.  Finally, she  overstamped the background with an image using black StazOn.  The results are beautiful!

This card is my version, using their "Silence" stamp.

For this next card, I created a mask from Tim Holtz' "Weathered Clock" die and used the TH "Old Car" stamp for the front image.  I also used TH Distress Inks; they tend to be a wetter dye and so the colors lend themselves to blending really well. I left the mask image blank and liked the contrast it created with the dark colors.  I went ahead and attached the clock hands that the die made with an eyelet to complete the card front.

For this next card, I used SU's "Lattice" die to create a mask and used the "Silence" stamp again as the front image.
A little "oops" required me to hand-draw a third bird flying around on this card!!  You'll have to compare the two cards (the pink one and this one) to see if you can figure out which is the "extra" bird LOL!!

And just for fun -- and because I love the technique, I made another card with the markers direct-to-rubber technique that I learned from "Local King Rubberstamps" last year.  I included a few quick pics of how it was made.


Used SU markers in Bermuda Bay, Ballet Blue, Pear Pizzaz for the color on the birds.


A photo of the rubber that has been randomly colored with the markers. Part of the technique is to then add a tiny bit of black here and there onto the colors before stamping.


This is the first "layer" of the image stamped onto the glossy paper.


I then colored a Rubbernecker branch stamp called "Floral" in the same way using Always Artichoke and Chocolate Chip and stamped it onto the panel.  

Finally, this technique has you using a background stamp over the entire image.  Here I used SU's retired French Script with Adirondack "Lake Mist" ink for my "background".  It's such a light color that it doesn't interfere with the main image colors.


TFL, I'm so glad you stopped by!

Monday, June 13, 2011

Fathers Day 2011

Hi Friends,

This is the card I'm making for Father's day.  Kinda funny how the simpler the card, the more I stress about it!

I used my favorite DP set (Basic Grey Max and Whiskers) as my color inspiration, and my favorite technique on this card: "Marker to Glossy" (I just this minute named it that, I don't really know what it's really called LOL!).  Just color your [mostly] solid image stamp directly with dye markers then stamp the image onto glossy cardstock.  The smoothness of the cardstock surface subtly blends your colors so you don't have hard lines.  You get a watercolor, kinda shabby look.  I did discover while making this card that Tim Holtz Distress inks work really great with this technique!  Distress inks are a wetter composition, so the colors blend really well when you smash them down onto the cardstock! Check out this link HERE to see other samples Ive posted using this technique.


I applied TH "Tea Dye" ink to my image (TH Collection Car), then colored in random areas direct-to-stamp with SU! "Not Quite Navy" and "Ruby Red" markers.  The last step of this technique is to always add a little "black" ink to your stamp, so I touched over a couple of ares with a black marker and made the tires black as well.  The sentiment is Technique Tuesdays "Simply You".


A dressed it up just a bit with paper flags from Imaginesque.

Thanks to the following Blog owners for letting me enter this in their weekly challenges:

  Stamp, Scrap & Doodle Saturdays:  Father's Day Challenge
  Secret Crafter:  #138 - A Male Card
  Crazy4Challenges:  C4C91 - Masculine
  Creative Inspirations:  #61 - Fathers Day Card
  Dream Valley Challenges:  #9 - Fathers Day

TFL, I'm so glad you stopped by!

Friday, July 16, 2010

Did I Just Make a Christmas Card?


Egads!!  This didn't start out to be a Christmas card, but when I showed it to DH, we both kind of said it at the same time, "it looks Christmas-y".  So I added a holiday sentiment and sealed the deal!

This is for this weekends Inspiration Challenge that I'm hosting over on SCS.  Hope you can join me!  The web store is awesome!!  I love it!!  It's called "Georgie Love" and it's a source for Australian artists in Victoria to promote and sell their hand-made works to the world. 

I chose this "Jenny Lamp" for my inspiration piece.  The leafy vine on the lamp shade is similar to a stamp from SU's "Paradise" stamp set that happened to be out on my desk so I used it.  The colors were even close to the new colors introduced by SU this year, (which I LOVE LOVE LOVE by the way!!)  so it was a lot of fun to get to use them all on this card!

I used Marina Mist, Crumb Cake, Early Espresso, Wild Wassabi and Cherry Cobbler markers to cover the stamp each time and stamped onto glossy CS.  It's a pretty small stamp so it didn't take much to color it each time. 

The bottom half of the card front is Crumb Cake CS and the sentiment is a SU Chit Chat rub on.  It's layered with dimensionals onto Cherry Cobbler and Early Espresso.  The finishing touch is a 5/8" grosgrain ribbon in Real Red.

TFL, I'm so glad you stopped by!

Wednesday, June 30, 2010

Olivias Flowers

Just up too late tonight...might as well stamp!!

This first card is SU's new Because I Care.  I colored it with markers, stamped it on glossy and matted it with Marina Mist, Early Espresso, Black and Websters Lullaby Lane DP.  Added a ribbon, button and charm.


This is made with Coordinating Woolies for the Basic Grey Oliva line.  Just made the panels, layered them in black and attached the flowers and a ribbon.  Easy peasy!! 
TFL, I'm so glad you stopped by!

Saturday, June 19, 2010

Experimenting with the Marker Technique

These are more cards I made using markers directly onto the stamps and then stamping onto glossy paper.  (See my post from earlier this week.)  The effect is really crisp and clean when you see it IRL, not sure how much comes across virtually!
The two roses above were actually an experiment.  I tried out two different "qualities" of glossy paper.  The one on the left is the recommended "High Glossy" paper -- I purchased it from Lisa Yang (Local King Rubber Stamp) when I bought her Chicks stamp set.  The one on the right is photo paper that I got from the $1.00 store.  There is definitely a difference, although I don't know if anyone but the stamper would notice, especially since someone receiving one of these would not have the other to compare it to.  But in the photo above, can you see how the colors of the rose image on the left are more softened and blurred between colors?  That tends to look better than the hard lines like the one on the right.  But again, I don't know if anyone else would really notice, so if it's not in your budget to buy a high-quality glossy paper for this technique, I wouldn't worry about it.  Go with the glossy you have.


Side Note:  So as you can see, I went to town again with more of my Peel-off stickers (from Frantic Stamper) on the card on the left.  Can't be helped, they're addicting and I bet if you saw them yourself you would have a better appreciation for them!!  LOL!!  I love them!!


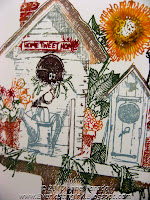
I also tried the technique on a stamp that is not solid -- typically you would stamp this image and color it in.  Instead, I scribbled marker directly onto the rubber -- and I really didn't try to follow the lines so much.  I just kept coloring the parts of the image as best as I could identify them (hard to tell when you can only see the rubber!).  When I turned it over to stamp it onto the glossy, I was pleasantly surprised that it looked half-way decent.  I actually missed a few areas, but in the end, I don't think it's that noticeable. 


Here's the image mounted onto soft sand and coral textured Bazzil papers: 

Both the stamps in this post are BRAND NEW!!  The rose is Penny Black "The Look of Love" and the Birdhouse is Impression Obsession.  Both of them, and many many other fabulous new ones can be found at Frantic Stamper... seriously, you need to check out all the new stuff there!! 
Hugs Everyone!!  Thanks so much for stopping by!