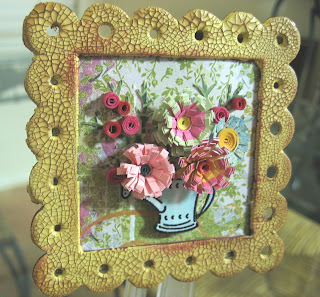
 See list of supplies used for this project below.
I love dimension and texture on my cards. I love "girly" cards with flowers. I don't understand when someone says "I can't get that stamp set, I already have too many flowers." What?
This little project here is a 3x3 framed bouquet of flowers brought to paper-life.(It's DS's BD present. Good thing I haven't told her about my blog yet.)
 To make the frame stand (the back), I started with a coaster and chopped it up to get a piece measured 2-1/2 by 2-1/2". I cut one of the left over pieces of the cut-up coaster to 1-1/2 by 1-1/2. Scored the little 1-1/2" piece about 1/2 inch down. Then attached it to the 2-1/2" piece with some big brads to create the frame stand. Covered the front side of the frame stand with Basic Grey Perhaps paper. (Note, the frame stand at this point does not have the scalloped frame attached yet -- this photo is showing what the back looks like after it's all done.)
 Then I began fringing paper again. I LOVE my paper fringer. It got lost in the black to-do hole that is my stamping room and I happened to pull it out recently and now I want to add fringed and quilled flowers to everything!! (Hmmm...maybe I'll do a tutorial?? What do you think??) Anyways, this was the easy part, it didn't take very long to come up with a bunch of little flowers and I just picked out a few of them and arranged them on top of the fern things. I quilled a few dark pink buds (I don't know the technical quilling term for those little guys) and used them to balance out the arrangement.
Finally the Scalloped Frame. I first painted it with some Burgandy Rose acrylic paint and let that dry (maybe 10 minutes). Then I covered it pretty thickly with Ranger Distress Crackle paint in "Scattered Straw". This stuff is really cool!! Once that dried (about 20 minutes), I lightly brushed some of the drying Burgandy Rose paint, that was still on my sponge brush, over the crackle to highlight the effect. I love that vintage look!! Yeah Tim Holtz. Someone give that man a cigar. Once I was sure the whole thing was ready, I glued on the frame, over the flowers, to the frame stand.
I even have a bunch of cute litte fringed flowers left over for another project.
Here's the supplies used:
 Stamps: SU Itty Bitty Bouquet; Ink: Versamark Brilliance Black, Copics, Burgandy Rose acrylic paint, Ranger Distress Crackle Paint in Scattered Straw; Clear EP, Basic Grey Perhaps DP, Fern Punch, paper fringer
Flowers anyone?!
4 comments:
What a beautiful framed flower bouquet, Anne!!! I love the crackled frame and the flowers are AWESOME!! You will have to show me how that flower thingy works one day!!!
well, Anne...first off, congrats on starting your blog!!
second.........I LOVE this frame!! and as I already mentioned, my bday is in a couple weeks *wink*
keep up the fab work girly!!
I'll take two dozen in assorted colors! what do you mean a fringe machine!!! I have NEVER heard of that - so OF COURSE you have to do a tutorial! can you buy them somewhere?????
super duper card here Annie girl!!!
Wow girl you are just a genius.
Post a Comment