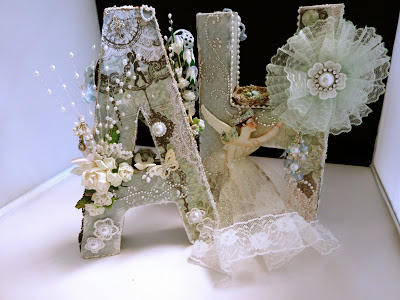
My friend Sandy and I decided to do an altered project "swap". She did a STUNNING job altering my initials for me and I altered an alarm clock for her.
This is the photo of the project Sandy did for me, it doesn't do it justice -- but the good news is, she has a YouTube channel so you can see all the details about her project by viewing her video here: "Altered Letters for Anne" . You HAVE to see the video, the details are amazing -- the back side of these letters are even more gorgeous so please do check it out!!
So here's the clock I started with -- an outdoor scene of brown bears in the woods in a dark brown, almost iron-colored exterior. It was a clearance item I bought for $2.00 because the alarm was broken.
I took it completely apart and gave all the exterior parts a primer coat of Gesso. This photo shows samples of the different stages of painting. The dark handle is the color it started with. The white on the bell is the Gesso coated sample, the green/gold clock base is my final coat and my attempt at an aged patina look.
To get the aged patina look, I "wanted" to try out the Ver Day patina technique, but it was going to take 48 hours just to let the first coat dry and I only had an afternoon to do this. So instead, I just dry brushed some turquoise acrylic paint and TH Metallic Distress Ink in Antique Bronze on top of the Gesso coat, and it all dried almost instantly. It pretty much gave me the effect I was looking for (without the wait!). BTW, those TH metalic distress stains are the bomb!! Seriously fabulous glimmer and mixability. Love them!!
This is a picture of how I altered the alarm bells. I turned them upside down and lined the insides of them with some brown vintage lace that I had in my stash. For the outside of them, I found some lightweight swirly metal pieces in my stash too, so I bent them as best I could to conform to the shape of the bells and glued them on with E6000.
The green cabachon rosette bling on the bell is actually an earring from a $1.00 pair that I bought just for the purpose of using it on a project "some day"! I snipped off the post of the earring and glued the decorative part onto the bell.
Once those were done, I started on the face of the clock (under the glass), I found an image of a lady from the Graphic 45 "Ladies Diary" collection that I liked and strategically cut out a circle shape from the DP that included the lady. I covered the clock face with the circle, covering the clock's original photo of the bears and mountain scene.
Then the fun part. I started adhering my doo-dads, ribbon, swirly bling and a variety of paper flowers to the "new" clock face. Some of the flowers I used were extras I had already made for other projects (photo below), so I painted the mis-matched ones with the same turquoise and bronze paint combo that I used on the clock's exterior so they would blend with the color scheme. Some of the other flowers I had purchased from a variety of sources and they were part of my stash.
I had to keep playing with the composition of the whole thing to make sure it all fit under the glass without getting crushed once I put the clock back together! The photo below shows a few of the charms that were included in the design (a clock face, bird cage, little keys).
When the face was all done, I reassembled my clock pieces (the bells, handle, legs and glass front) and began altering the outside of the face - on top of the glass. Again, just randomly selecting items that I liked and thought would go with the design.
The larger swirly piece on the top part of the clock is a molded embellishment by Melissa Frances. That was originally white and actually the first piece I glued to the glass. I painted the piece with the same paints I used for my patina effect prior to gluing it onto the clock face.
Below is a picture of the clock's Left side, the embroidered applique towards the bottom is by Mon Ami Gabby (love their stuff).
Here's a photo of the clock's Right side; it's got another of the same applique, some fabric roses and a few "leaf" beads by BlueMoon beads.
And that is pretty much it! (This is what my craft space looked like when I was done!)
Whew!! What a great way to spend a Saturday afternoon!!
A few more photos of the finished clock:


2 comments:
Anne, this is amazing! Love all the fabulous details. It went from boring brown to absolutely stunning!
Oh Anne! These are gorgeous! Truly works of art!! Hugs to you :-)
Post a Comment