Monday, April 27, 2009

Belli Up Challenge #64

Here Ye...Here Ye...We are changing the Belli Challenges to be a BI-WEEKLY EVENT! We thought this would be a way for you to have more time to participate! This week, Chrissy's Creative Belli Challenge is to use jumbo eyelets or jumbo brads on your project. I went with the jumbo brads because I have suddenly found myself with several clear boxes of Basic Grey Glazed Brads (oh how did THAT happen??) -- and I love them all!! I used Old Olive CS as my card base, then layered white CS and a textured Bazzil green CS on top. The flowery white, doodly, main image is a rub on from SU. I added some half-back pearls to some of the smaller flowers and die cut and punched daisys using MS Layering Daisy punch, SU Daisy #2 Sizzix die, and one of the flowers from the SU Boho Blossoms punch. And as you can see, I attached the white daisys with the Jumbo Brads. On the bottom of the card, I used "Perhaps" DP from Basic Grey, an Old Olive twill ribbon from SU, and the MS Lacey Border punch to finish it off. So why don't you join in the Belli Challenge this week!! Go to the Creative Belli Blog, check out the samples by all the other DT members and pull out those Jumbo brads and eyelets!! Then create a project using your Jumbo accessories and share the link with us using Mr. Linky - CBC64 over on the Belli Blog. When you post to Splitcoaststampers or to your Blog, be sure and put CBC63 as the KEYWORD and mention of the challenge - with a link! Many hugs to you! Thanks for checking in!!

Sunday, April 26, 2009

Cheep Talking Card

I know, what a goofy title for today's post, I couldn't come up with anything catchy. Anyhow, have you checked out the Featured Stamper over on SCS?? Today SCS stampers honors Wattle (aka Kathy) as the gallery goddess this week! Her gallery can be found here, and you are welcome and invited to case anything in there! What a great talent and so much to choose from. I chose her Beate-ful Butterfly card, which she made as a case from a previous Featured Stamper, but she changed it up just enough so it showcased her own style and personality.

So here's what I did with it.

I used Crate Paper's Blue Hill Collection for my DP. (It was still on my table from yesterday). I cased her sketch but changed up the embellishments, the stamps and of course the DP.

First I created the circle focal point using Scalloped Circle Nestibilities and SU's Cheep Talk set (hence today's title). Then I cut the center DP panel and white layer, punched a border with MS Lace Border Punch, layered those following Kathy's sketch and and added the bow. Then I pierced the holes around the border of the white panel and proceeded with the embellishments.

I was itching to do some paper flower punching so I decided instead of the pearl backs that she used, I'd make some flowers for the corners.


So I punched a bunch of a teeny flowers using a punch by Punch Bunch from some of the Blue Hill DP. Impressed them with a stylus so they would cup up.

Then I punched some fern branches with my Marvy fern punch and glued those onto two of the corners of the card.

Then I just started gluing and clustering the flowers on top of the fern branches. This is really easy to do, even though it may look complex. I just pour some Zip dry glue onto a non-stick piece of paper (like the part you remove from the backs of stickers) so I have a pool to use. Then with tweezers, I grab a little flower, dip the bottom into the pool of glue and stick onto the card. Takes very little glue and it all dries clear so you can move them around on the card to position them until the glue dries.

I put a teeny bit of glue in the center of the flowers and dropped a white seed bead in them. This picture shows the flowers before the glue has dried so I was still moving around some of the flowers and setting the beads in the right place. For this I use a wooden finger nail manicure stick (but you could use a toothpick).

Once it's all dry (see, you can't see all the glue I smeared all over it), all that's left to do is photograph it and post it on my blog!! (After photographing this card, I noticed couple of the beads fell off -- don't look!!)


Hope you like it!! Congrats again to Kathy and thanks to ya'll for checking in!!

Saturday, April 25, 2009

So Many Challenges!

Hello all! I'm just roaming all over the blog world today...it's mind boggling how many different challenges there are out there!! This card is for the Saturday 
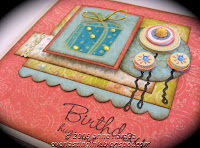
Cuttlebug Challenge. Today it is actually a scrapbook page sketch challenge, but I just loved the layering in this design that I knew I had to make it a card! Here's the sketch and the sample. I used the Bluehill Collection by Crate Paper, L-o-V-e this paper!! It's rustic and whimsical all at the same time. The Cuttlebugging was done to the second layers...the bubbly looking folder. The sentiment is SU's Hugs and Wishes. Dimensional bling balloons (they're designed to be flowers but let's pretend they're baloons!) are by Marcella K from Target. Added some stretch gold cord for the present's bow and a bit-o vinyl Class Apeal stickers to follow through with the layout. Thanks for checking in!!

Magnolia Challenge

Hope ya'll are having a great weekend!! This cute little Magnolia sweety is for the Just Magnolia Pink and Green Challenge. These images are so fun to color!! Thanks to Julia (Create With Me) for sharing! I just love 'em all!! After coloring her with copics, I added a tad bit of sparkle using my Copic Spica Glitter Pens (remember those, anyone out there still using them too??) over the edge of the wings and the little cross she's wearing. I stamped a couple of sentiments from SU's So Many Sayings and punched them out with SU Word Window punch. Attached them to the ribbon. The ribbon I used ($1.00 bin from Mike's) is actually white, green and pink striped already, but I colored some of the white, wide stripes with the light pink to match the colors better that I used on little Tilda. Thanks for stopping by!!

Kleenex Anyone?

Fun challenge over there on SCS!! Stephanie (her blog: Ingenious Inkling) our IC Queen has challenged our creativity today by giving us a link to the Kleenex Website and asked us to use any of the boxes as our inspiration. I chose many... and finally settled on this one. I started with Pale Plum CS from SU and stamped See Ds Bold Carnations in White Canvas from Pallette. Next I randomly stamped the rose from the Fifth Avenue Floral set by SU in Elegant Eggplant. Lastly, I stamped a leafy image from Hero Arts called Three Ferns in Elegant Eggplant. I really wanted to add the bird in, but it was so randomly positioned on the box, I just couldn't do it! To finish off my Kleenex card, I used a piece of Perfect Plum CS and punched a border with a border punch by Paper Studio. The sentiment I added is a rub on from SU's Chit Chat pack. Thanks for checking in!!

Friday, April 24, 2009

Hey! Check this out!!

Click on the link below... ---> Bus Advertisement!!! hee hee, made me smile...

Thursday, April 23, 2009

It's All About the Tools!

Tools used to make this One little card: Big Shot, Nestibilities, Cuttlebug Embossing Folder, Cricut, 3 different punches, Character Shaping tool.
Made this card for my mom's birthday last week! It is very tool - intensive, but in the end, that just means it was super duper easy!! The tools did all the work! I had all the supplies out on my craft table for this so I just went for it. The CS is PTI Aqua Mist, SU Whisper White and a teensy bit of Old olive for the little flower stems. I used the Cricut Storybook Cartridge to cut out the sentiment, then my Lables 4 Nestabilities die to impress a frame. I used the Cuttlebug dotted border EF from the Just My Type set for the bottom edge. I tied a PTI Aqua Mist ribbon around the first panel and then proceeded to make my flowers. The first punch I used for the flowers was the MS Layering Daisy Punch. I punched out two daisys in white CS, then shaped them with my cool "character shaping tool" (which is a very inexpensive but useful tool if you like making paper flowers!), and added a large half-back faux pearl from the SU Pretties kit. Then I used my SU Trio Flower Punch and punched several small flowers from white CS, inked the edges with PTI Aqua Mist ink, and impressed them to make the petals pull. I dropped a white seed beed in the middle to finish them off. Finally, I punched a couple of sprigs out of Old Olive CD and adhered everything in place. Thanks for stopping by!!

Sunday, April 19, 2009

Dest Top Organizer

These fun In/Out Boxes are sized to fit any number of little goodies inside. This was a project for my Card Club last month, I am just behind on blogging it! I bought the Desktop Organizer template from PTI My Timeless Templates by Lauren Meader, but the size was bigger than I wanted so I scaled it down to be approx. 3-1/2 x 3-1/2 size. Now it fits a stack of 3x3 cards and envys, or a post-it note and short pen, or a little desk set from Michael's that was only $1.00 (I snagged about 10 of them so I needed to find "something" I could do with them)!! The organizer is sooo simple to make and even more fun to fill up!! Thanks for checking in!!

DoubleDog Bumps!

I had to catch up on my Doubledog Dare Challenges, had one more left over from last week. Ms. Bees (aka Bev of Beestamper fame!) challenged the girls to make a bumpy card. I thought that was way cool because I love dimension on my cards and so it was fun making intentional choices to make it bumpy!! So, first thing was to find a bumpy focal point. I have to say, that was hard only because I have a room FULL of bumpy embellishments! I finally chose this green and pink butterfly from a 3-Dimensional set of butterfly stickers by Marcella (Target) because I also wanted to try one of the Dirty Dozen Challenges this month. The theme is "Going Green" ("April 2009 - Using recycled products, found items, or just the color itself") so I was going for green as my main color on this card. I had my fav Me and My Big Ideas DP stack still on my table from this morning's Featured Stamper Challenge so I rifled through it to find a print that would match up with my green card base. I used Nestibilities Label 4 dies to frame the butterfly with the DP and some pink textured Bazzil. Next -- more embellishments! I found some matching SU Certainly Celery grosgrain ribbon and threaded some big pink Czech Glass beads onto it. I punched a hole in a piece of matching chipboard from Me and My Big Ideas Fashion District line and hung it from the ribbon between the beads. Added a little green jewel (Jolee's Jewels) to the center. I thought the ribbon still looked a little boring, so I glued a few mini rhinestones to the other end of the ribbon. So in the end, nothing was stamped here...(I find myself letting the DP and other embellishments do all the work lately). I'm not even sure what occasion to use this card for, but alas, I promise to send it to a good home! Thanks for stopping by!!

Friday, April 17, 2009

Layering Images

Oh wow, I had such a great time with today's Inspiration Challenge over on SCS!! The inspiration website this week is called Skeem. They sell pillar candles, perfumes, that sort of thing. As I was going through it, I was intrigued by the transparent layered look of the pillar candles. Layers. Transparent. Layers...transparent...oh yah...this was gonna be fun!! To recreate the layered look of the images on the pillars, I grabbed my brand new Printed Window Sheets from SU and cut away the corner quarter of the sheet that has the flower bursts. Then I got out two more clear sheets and on one, I stamped a Hero Arts leaf image with Teal Blue Stazon, and on the other I stamped the butterfly from the God's Beauty Hostess Set by SU with Black Stazon. I layered the 3 transparency sheets together using doublestick tape (my ATG gun). I then taped the stack to a base card I had made into a window card using a Nestabilities Labels 4 die. Behind the transparencies, I adhered a piece of Close to Cocoa Pattern Print by SU to cover (and hide!) the tape on the back of the transparencies. To finish it off, I used a sentiment from Chit Chat rub ons by SU and a couple of half-back faux pearls (isn't it funny that I called them "faux" pearls, like you might think they're real if I didn't say that LOL!!). Thanks for checking in!!

Double Dogs!! (Get it??!!) Snoopy Cards!

Last month marked the beginning of many many "Boy" birthdays that I have to work on. From March thru May, between family and friends there are at LEAST 11 boy birthdays, not to mention one of those boy birthdays is DH!! EEESH! Here's a couple that I've done. Both are stamps from HL by Stampabilities: Snoopy's Chooper Snoopy Flying High These were pretty quick to do because I used the same color scheme (i.e., Copics) for both and the same sentiment from SU (All Holidays). And ... this is also for this weeks Doubledog Dare Challenge!! The very talented and inspiring Anne (aka Inking in Red -- check out her blog, she's the bomb!!) challenged us to make a card using only red, black and white. Why don't you give this challenge a try!! Upload to SCS and use keyword DDC so we can check out your card -- or post to YOUR blog and we'll stop in to visit!! Just leave me a comment to let me know about it!! Thanks for checking in!!